WINTER 2016 ACRYLIC
CLASS Project: Cozy Cottage Week 4
This last
class we worked on putting in some intermediate highlights, the snow on the
cottage and basing in out wood pile and the fence in front. We only have a
couple of weeks left in the semester so you need to get caught up to this
point, I do want to finish it before the last class.
Starting with
the cottage roof, we need to do a couple of things, one is to add some straw to
the roof and some snow. It might be easier for you to add some detail to the
straw before adding the snow just know that all's not lost if you do it the
other way around, you will just need to be more careful.
The thatching
on the roof needs to show some highlights and also some shadows this will be anintermediate highlight using yellow with a touch of burnt sienna and a touch of
white for the sunny side, it should be lighter that what is already there. The shadowed
sides of the roof use the same color but add a touch of blue to cool the color,
depending on how dark you made your original shadows this color could be darker
or it may be lighter which is okay, you are just adding some texture to the
roof at this point.
Use a flat
bristle brush that is not too big for the area but you also don’t want it too
small, I was using my #4 however, if you are working on a smaller canvas or
your house is smaller you may want to use a #2 flat bristle. This is a dry
brush technique so watch the water in your paint – it should be like soft
butter – and also in your brush, dry it out before you pick up paint and squeeze
the back end of the brush with your paper towel to get out extra moisture, you
might also want to spread the bristles and wipe out excess paint before
starting.
Before you
start to paint stop and think about what you are painting and LOOK at the
reference photo. The roof is at an angle, you strokes need to be at the angle
of the roof, when you pull down your stroke should look scratchy, you want to
see the under painting because this creates texture, that under painting
becomes shadows, don’t lose it. Practice before you start on your painting.
I also added
the chimney to the roof using burnt sienna; a touch of orange for the sun lit
side and added a bit of blue to the color for the shadowed side.
 While your
roof is drying you can start on the intermediate highlights of the snow. These
highlights are not the brightest highlights but they do give depth and texture
to your snow as well as shape so they are important. Mix up a cool color
starting with your ultramarine blue and purple then add enough white to it to
make it one or 2 values lighter than what you have from last week and even a
touch of burnt sienna to grey the color slightly. Remember that this is a cool
color, if it looks too warm or too brown you will need to add more blue, the
sienna should just grey the color slightly.
I know I say
this a lot, but look at your reference photo BEFORE you start painting and
think about WHAT you are painting and HOW you are going to paint it. Think of
the SHAPE you need to paint and the direction it needs to go in, when you paint
just blindly you are not going to get the results you want. When I am painting
whether it is a demo or a personal painting, I am constantly doing all of the
above, that reference photo is my roadmap to my goal and if I don’t follow it I
will end up doing it over. There is a lot of thought process going on with each
stroke and when you are new to painting that process will take a bit longer but
it is essential to your finished painting.
Where the
snow drifts up the house your strokes need to follow that drift. When they are
creating lumps and bumps in the road they are curves long and short, up and
down. They follow the curves of the hillsides leading up to the house, look at
the ruts in the road and how the snow sinks in and where it doesn’t, see this
before you paint.
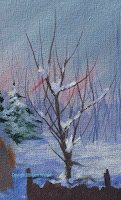
 You can also
use this color to under paint the snow on your trees – the pines behind the
house and in the crooks of the leafless trees on the side and the snow patches
if your roof is dry. You always need to do a darker under painting no matter
what you are painting because this becomes shadows and texture.
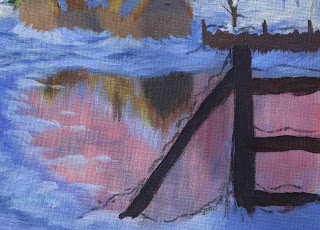
While this is
drying you can sketch in the wood pile in the back near the house and the fence
post in the front. Paint them in with a mix of siena with a touch of blue and
purple and also a little white for the background wood pile and same mix
without the white for the foreground fence post.
 Lastly, when
the snow was dry on the trees, I added some highlights. The sun is coming in
from the left hand side of the painting so your highlights will be on the left
of objects in your painting. Using a mix of white (I use my gesso) with a
teeny, tiny touch of orange to slightly tint the white tap in this color in
your trees leaving the cool color as shadows.
You can also
use this color using a dry brush technique to add a highlight to the ground
around the house. Again, do not cover up all the color that’s there because
that will be your texture and shadows.
I hope that
you have your paintings up to this point because we have a lot of ground to
cover before the semester ends. Keep painting and I will see you all in class.


No comments:
Post a Comment