skip to main |
skip to sidebar
Project: Alaskan Fishing Village Week 2
In our first class, we put our sky and distant mountains in then added the darker under painting for the trees and the grassy area near the water, in our last class we started adding detail to the trees and reflections in the water and the under painting for the buildings.
The first thing I did was suggest some detail in the trees behind the buildings. It is always good form to do the things that are behind other things first so you don't have to try and paint around the things that are in front.
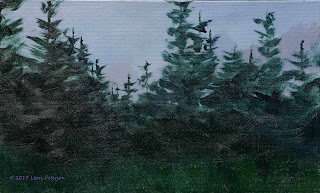
I was using my #4 flat bristle brush, with a medium value green - Hooker's with a little yellow and orange to soften the green and occasionally some blue to change the color. The stroke I used was just like the one I used to create the trees in the first place but I did try and leave some of that darker green for the shadows. Study the reference photo before you start painting the trees and notice the light and dark areas. the light areas are where the ends of branches and the dark areas are deep inside the tree, so don't lose those dark areas and be sure that your branches look like they are coming out from around the trees and not just the sides like fish bones.
You can also start the reflections in the water at the same time but the technique is a bit different. When you do water it seems to work best if you pull your brush straight down when adding a color then lightly go straight across.
I was using the Hooker's, ultramarine blue for the dark and touches of yellow and green for the lighter greens and blue and a little gesso (white) for the patch of sky but all of those color I pulled straight down then lightly across so you need to work fast to keep the paint wet to blend.
When the background was dry,I added my sketch.
Again, LOOK AT THE REFERENCE PHOTO. The brown building is at a slight angle away from you so don't make it flat on to the viewer. Don't worry about absolute perfect lines, these are old building and I doubt there is a straight line in them, but perspective is important.
The red building isn't red yet. While that looks red it is actually napthol or cad red with burnt sienna in it.
The brown/gray building is under painted with a warm gray. My basic gray color is ultramarine blue and burnt sienna with white to change the value. I wanted a warmer gray so there is more burnt sienna than blue.
The important factor in painting these buildings is to be aware of the direction there different parts are going. I keep repeating this because it is important: Look at your reference photo. The roofs are at a slant, follow that slant with your brush strokes. The front side of the brown building and the top part of the front of the building, the boards are horizontal, make your strokes horizontal. The lower part of the front of the building is vertical, make your strokes vertical. This is important because your eyes pick up on the slightest things so paying attention to direction is important.
This is where we left off and will pick up in our next class.
Keep painting.
Acrylic Project: Alaska Fishing Village Week 1
Starting this project I am working on a 16 x 20 gallery wrapped canvas that I have painted with 2 coats of black gesso, using it in the portrait or vertical position. I must stress, you DO NOT have to work on a black canvas if you don't want to, I just like to show the class variations and options so each student can make up their own mind. This will work on a white canvas or toned canvas as well, it is up to you.

That said, I started out with what is the furthest away, which is the sky. I didn't want it as dull gray as the photo so I created a mix of white (I use gesso for white), ultramarine blue and a tiny touch of burnt sienna to slightly gray the blue. I want the sky to be a bright overcast color but not real brilliant blue.
Starting at the top with my #10 flat bristle brush, I used a series of crisscross strokes and worked my way across and down about half way down the canvas. I picked up touches of blue and gesso as I worked my way down the canvas, blending some but not blending completely so it looked like the sky was clearing.

While the sky was still wet,I added some distant mountains. I added more blue and a bit more sienna to the sky mix so that it was just a bit darker than the sky, using the same brush but using the end of the brush and pulling down, I created the top edges of the mountains, then blended the bottom of the mountains into the sky color. The next closer mountain was done the same way by adding more blue and a touch more sienna to make the color a bit darker than the previous mountains, this time I used the brush vertically to use the end to make the top ridge of the mountain so I could get an uneven edge. This will look like crags an tree tops which is more natural than just a smooth curve. Again I blended the bottom of the mountain into the sky color but I was following the lay of the land,these are mountains not walls.
I let the background dry before I added the trees.
It is important when you are painting a wild landscape to not line everything up in nice neat rows, that is a very human thing to do but Nature isn't like that, Nature is random and chaotic. If you look at the photo, you will see that the treeline has trees of all sizes and shapes, that is what you need to aim for in your own painting. You can start out by using your charcoal and just drawing lines where you want your trees to be, use the photo as a guide. Make some so tall they go off the canvas, others as smaller, some are behind and they all over lap each other, it is a forest there are a lot of trees.
I used the same brush (#10 flat bristle brush) and mixed sap green (you can use Hooker's, which ever is darker), some ultramarine blue and a touch of purple (a touch is a very small amount or the purple will rule your world) to get a very dark forest green, this is the under painting for the trees and becomes the shadows of the trees.
 I shaped the end of my brush by dragging it through the paint on both sides to bring the bristles together, then using the end of the brush vertically, I touched the place I wanted to start the top of the tree to create a line. Do this a couple of times to make a line, then use the corner of the brush starting down a bit from the top of that line and "flip" the brush out to create the branches. Short "flips" create smaller branches, longer more drag and flip create longer, bigger branches. You might want to practice this before you try it on your painting.
Don't be afraid to overlap and congest the branches.If you look at the reference photo, you will see that the trees get very dense near the bottom but it is okay to leave "sky holes" in some of the middle and top parts.
The last thing we did in class was under paint the grasses along the shore. I had used my chalk to suggest the shoreline before I started painting so I would know where to stop adding grass.
You might notice that there are no buildings or boats or anything else to suggest a village, those things come later after we get in all the surrounding trees and bushes this way you avoid "halos" around structures because you are afraid of painting over the building you worked so hard on. We will get there, be patient.
To create the grasses, I am still using the #10 flat bristle brush, this time I will be using the flat side of the brush. I load the brush with sap green and yellow, then with the flat side of my brush almost parallel to the canvas, it is sort of a "pat and scoop" motion. You press the brush onto the canvas, then push and lift in one stroke. I was picking up green on my brush along with yellow and touches or orange and blending them on the canvas so it wasn't just one solid color, you want variations. Remember this is just under painting but it is important, think of it as the foundation of a house, without it you will struggle to make it work.
I stopped there, we will continue on from this point when we meet again. Keep painting and I will see you in class.


