Acrylic
Class Project: From My Garden
Week
4

Our
project is getting into its final stages when we refine the shapes, get the
colors to the intensity we want, finish our background then, when all that is
done, we start working on the finishing detail.
Your
painting should be to the point where you can wipe off any charcoal or chalk;
this will give you a better idea of how your painting will look. The charcoal
lines have done their job but at this point can be a distraction when you are
deciding what needs to be done next. You can always put some lines back in if
you need them, however, by now you should be able to do without them.
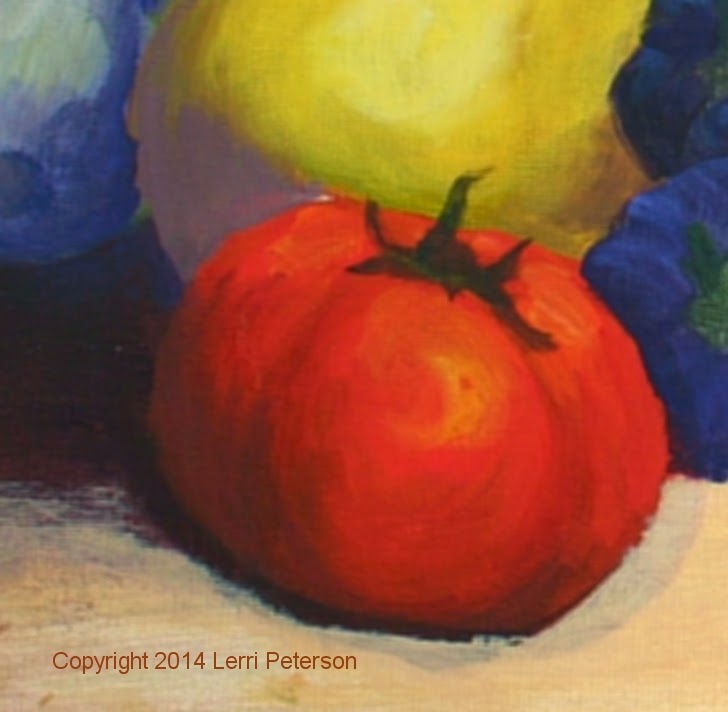 I
did show how I can change something I didn’t like because I thought it was too
big, without going through all the trouble of painting it out and starting over,
which many of you do. I thought that my large tomato was way out of proportion
to the things around it so I needed to trim it down a bit. Using my charcoal I
sketched in where I thought I wanted the outside edge of my tomato, made a
couple of adjustments with the charcoal to get the tomato the size I wanted
then went back in to the areas that needed to be painted out with a color that
was similar to what it was going to become, for instance: Some of the tomato I
needed to erase was going to become part of the zucchini behind it. I took my
#4 flat bristle brush mixed yellow, white (gesso) and a touch of purple to
match the color that was already there and painted the part of the tomato that
was too big to match. Was it a perfect
match? Probably not, but it doesn’t matter, I still had some work to do on the
zucch so it was close enough.
I
did show how I can change something I didn’t like because I thought it was too
big, without going through all the trouble of painting it out and starting over,
which many of you do. I thought that my large tomato was way out of proportion
to the things around it so I needed to trim it down a bit. Using my charcoal I
sketched in where I thought I wanted the outside edge of my tomato, made a
couple of adjustments with the charcoal to get the tomato the size I wanted
then went back in to the areas that needed to be painted out with a color that
was similar to what it was going to become, for instance: Some of the tomato I
needed to erase was going to become part of the zucchini behind it. I took my
#4 flat bristle brush mixed yellow, white (gesso) and a touch of purple to
match the color that was already there and painted the part of the tomato that
was too big to match. Was it a perfect
match? Probably not, but it doesn’t matter, I still had some work to do on the
zucch so it was close enough.
When
you paint something out with gesso the problem becomes not only matching thecolors you had but also just painting the part you gessoed out, the key to “fixing”
anything on your painting is to not only paint the area you want to change with
the color you want it to be, but work the new color into the surrounding areas
to make any slight change of color or value look like it belongs there. Dry
brush the color to blend areas and no one will ever know unless you point them
out. The old Masters did a lot of corrections on their paintings before they
called it good and people didn’t know until scientists x-rayed them and found
different versions as well as corrections, so don’t worry about things that
need to be fixed or changed, you are in good company, you just don’t ned to
start over in an area, just go with what’s there.
 I
like dramatic light, if you want a lighter look to you painting or want to put
in some other kind of background, you do not have to make your background with as
much contrast as I have in mine but now is the time to be sure that your
background is where you need it because from here out we will be finishing up
the veggies and you don’t want to make things harder for yourself if you have
to paint around things.
I
like dramatic light, if you want a lighter look to you painting or want to put
in some other kind of background, you do not have to make your background with as
much contrast as I have in mine but now is the time to be sure that your
background is where you need it because from here out we will be finishing up
the veggies and you don’t want to make things harder for yourself if you have
to paint around things.
You
will be working to get shadows on your veggies, the light is coming from the
front upper right as if there is a window opposite the veggies and the sun is
coming in. The things with the brightest highlights will be the yellow zucchini,
peppers, big tomato, to a lesser extent the tops of the melon, pumpkin and the
tops of the garlic. Everything else will have highlights but they won’t be as
intense as the aforementioned elements.
 I
can write pages and pages on how the light is falling on each thing in our
painting but unless you can see this for yourself, my words will be wasted. If
you can set something up in your own house, find a window that has light coming through it, put some things on a table
where you have a “sun spot”, it doesn’t even need to be veggies, just things
with different shapes, turn off the interior lights and look at how the light
plays on the objects. Find the brightest highlights, the darkest shadows, note
the colors in the light and away from the light but not necessarily in the
darkest shadows. Take a photo of the scene for reference so you can try to
understand this play of light: Where does it come from? Where does it fall?
Where are my shadows? You will find sun spots everywhere if you just look. As I
have said in the past, the more observant you become the better an artist you
will become.
I
can write pages and pages on how the light is falling on each thing in our
painting but unless you can see this for yourself, my words will be wasted. If
you can set something up in your own house, find a window that has light coming through it, put some things on a table
where you have a “sun spot”, it doesn’t even need to be veggies, just things
with different shapes, turn off the interior lights and look at how the light
plays on the objects. Find the brightest highlights, the darkest shadows, note
the colors in the light and away from the light but not necessarily in the
darkest shadows. Take a photo of the scene for reference so you can try to
understand this play of light: Where does it come from? Where does it fall?
Where are my shadows? You will find sun spots everywhere if you just look. As I
have said in the past, the more observant you become the better an artist you
will become.
That
said, there are a few things to be aware of as you are getting ready to finish
this painting. First, even though we think of tomatoes as red, there is a lot
of orange in the color. If you get the color too red or crimson the tomatoes
will look like apples or cherries and when you are making the highlight areas
of your tomato, lighten the color with yellow and/or orange because white will
make the color pink.
Be
sure to have all the stems in place and when you are doing your shadows use
blues and purples in your color. In areas where one veggie is in front of or
goes behind another, there is a cast shadow that is very dark and where you
have dark, you can add a bit of light in front of it to separate the veggies.

Do
as much as you can, I will probably finish up my painting this next class so
you might want to start looking for your own project to start working on but if
you need more time to finish this one, don’t rush we still have 4 weeks before
the end of the semester. See you all in class.
