skip to main |
skip to sidebar
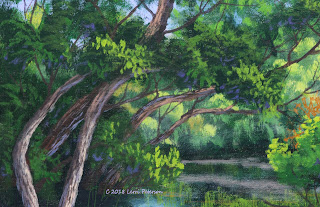
Acrylic Project: Marsh Madness Week 6
This was the official final week for out summer project, I did a bit of detail to mine that you may or may not want to do to yours, it is up to you how you want to finish your own project. You may want to look at the reference photo to decide what you want to do.
The branches on the right I highlighted with a lither version of the under painting: sienna, a touch of blue, white and I added just a touch of orange to warm it up. I used my #4 flat sable brush on the larger parts of the branches rather than paint a line, I touched the end of the brush to the edge of the branch, pulled down in a semicircle and lifted at the same time. This will give you a rougher look like it has bark. In the smaller areas, I just touched the edges of the brush along the twigs letting the canvas take what it wants, again to suggest a rough surface. I also made up a reflected light for some of the shadows on larger parts of the branches.
In the corner I used sienna and orange to suggest some dead leaves, but I also used a little of this color in the trees to the left and also added a touch of white to highlight the trunks of the small trees behind these branches.
I wanted to get just a bit brighter highlight in the small trees/bushes on the right as well as some intermediate greens on the sides that aren't quite in shadow. I started out with yellow and added some green for the brightest highlights, then added a little blue to slightly darken the color to the sides of these trees. You can also use these same colors up in the branches of the other trees on the left as well when you are done with this side. Again I was using my #4 flat sable, but used the corner of the brush to suggest the clumps of leaves.

You may need to practice making smaller individual leaves with your flat sable brush before you do the single leaves and small clumps but it is easy if you don't think about it too much, same goes if you are using a small round sable brush, practice first. Both brushes require you to touch, push and lift and do it quickly to get a reasonable facsimile of a leaf. No, the do not need to look perfect because the leaves are going in all directions so you will see blobs, fat ones, thin ones, curved ones etc, it just needs to look like it could be leaves. Don't clog up the area too much and try to get them coming off your branches and twigs.

On the left side I added more dark clumps of leaves then I used the same mix of light green (see above) to highlight some of those clumps. Even in the dark shadows there is a possibility that there is a hole in the canopy above that will let a little light come through, just don't get carried away, these are just touches. I used the slightly darker version to also add more leaves and to suggest the algae on the surface of the water, keep your strokes flat if you want it to look like it is floating on the surface.
I also added some dead branches in the trees and some more grasses at the bottom of the trees to set them into the water.
Finally, in the water I did a very dry brush glaze over most of what is water using my #4 flat bristle brush. This was a very watery mix of white (gesso) and a very tiny touch of orange just to slightly tint the white, it should look like cream so it is a bit warmer than white alone.
Remember, after loading your brush to wipe most of it out (dry brush), then used the small side of the brush and lightly glaze over the water areas using horizontal strokes. You can go over the reflections with this glaze bout avoid actual things. The reeds can be tricky but try to get some of this glaze over some of the water. You can switch to your liner brush or a small round brush and around the bottoms of some of the reeds suggest ripples and also along some of the edges of the sand bars in the back and around the base of the small trees.
Do as much or as little as you feel comfortable with to finish up your project. I hope you learned about green and reflections and that no matter how complicated something looks, you can only paint it one stroke at a time so anything is possible to do.
Keep painting and I will see you in class.
Acrylic Project: Marsh Madness Week 5
This week I started working on detail because we are nearing the finish line on this painting.
On the tree trunks on the left I added what is called a "reflected highlight". Light in out atmosphere bounces off of surfaces especially something like water and will bounce into shadow areas. This is not a bright light but a cool one. I mixed blue, purple, a little burnt sienna and white (gesso) to make a lavender blue color, with the chiseled edge of my flat sable brush, I touched along the edges of the trunks that were either in the shadows or over water all the time thinking about the texture of the tree trunks. I also mixed up gesso with a little touch of orange and sienna for the light highlight on the lighter trees then added more sienna and orange to create the highlight for the darker, redder trees.

Up in the trees after I had added the reflected light and highlights, I under painted clumps of leaves that are in front of parts of the trunks (look at the reference photo to locate the clumps). I was using my #6 flat bristle brush because I would be doing some scrubbing during the under painting but went back to my flat sable for the highlights.
The under painting was sap green or Hooker's plus (mine have sort of merged on my palette), blue and a very, tiny amount of purple. If you don't have purple add more blue and alizarin crimson, this will create a dark, cool green. I scumbled and scrubbed dark shapes in the trees, covering some trunks and painting around others. This color even goes out over some of the outstretched branches and around the base of some of the trees (look at the reference photo).
Since some of the top leaves of these clumps are in partial sun and others in full sun, there are 2 variations of color: To the previous dark color I added more green and added some yellow to get a lighter but still cool green and using the corner of my flat sable brush (you can use a round brush), I added this color wherever I thought light might be getting through the canopy. DO NOT COVER UP ALL YOUR DARK COLOR! That dark is your deepest shadows, look at the photo, you will see these dark areas especially near the bottom of the tree.
The lighter highlight was green and yellow only to make a bright sunlit leaf color and it only goes in a few places where the sun is hitting the leaves directly. You can use a bit of your "artist's license" but do not get carried away with the highlights of you will lose the sense of light in your painting.
That same bright green can be used in the trees on the right and you will probably notice that I used some of the lavender color in these trees as well as the ones on the left. Just a few of those lavender leaves adds a bit of life to your painting. I have also used that color when detailing the trunks coming out of the water, the highlight color was the same as I used on the left with just a bit more sienna.
I did a couple of things down in the water, first, I added more dark reflections from the line of small trees into the water with the dark green from above. I used a #6 flat bristle brush and the dry brush technique, pulling the color straight down to suggest the reflections.
Next, I started adding some reeds and grasses with my liner brush using several variations of green from dark to light, play with the color, you won't be wrong.
When that was dry, I added some of the branches that come in from the right with my liner brush and a dark brown (sienna, blue and a tiny touch of purple). I have marked what is branches and what is their reflection so you can find them on the photo, add just a touch more blue into the color for the reflection. I will highlight the branches next class.
I also used these same colors to add a few dead branches on the left and some reflections of branches in the water that may be hanging over the water but we can't see the branch that is reflected because it isn't in our painting but doesn't mean it isn't there. Remember that water reflects what is above it and I am sure there are a lot of branches we don't see that could be reflected in the water.
This is where I left off in our last class and we are getting very close to finishing up this painting. Try to have you painting as close to this as you can, we still have 3 weeks until the end of the semester so there is plenty of time to finish up.
Keep painting and I will see you in class.


