Fall
2012 Acrylic Class – Scotty’s Truck
We
start off the truck just like we start most paintings by starting with what is
furthest away and working our way forward. Since the sky is about as far as we
can go visually, that is where we start before we ever put on any drawing on
our canvas. This allows us to avoid a cut and paste look to our painting when
we are done. Unlike oils, acrylics dry quickly so we cannot blend or soften
edges whenever we want which is why we must start from furthest and work to
closest.
I
did do a little sketching in that I wanted to know where my sky ended and my
distant hills began then I took my gesso and applied a coating of it to the sky
area and also down a bit into where the hills will be. I did this with my 2”
soft blending brush and will continue to use this brush for the background, if
your brush has hard bristles, this technique will not work. You need a soft
goat hair blending brush which will make it look almost like air brush, any
other type of brush will give you streaks.
Next,
using the same soft blending brush, I first wipe out as much of the gesso as I
can but I did not wash it. To one corner I picked up ultramarine blue, on the
other corner I little burnt sienna and a touch of purple. You want the color to
be mostly blue, the sienna grays it a bit and the purple intensifies it a bit
but it will be mostly blue. Your gesso should still be wet when you add in your
color, with your bristles parallel to the top and bottom of the starting at the
top, just streak these colors across the top of your canvas and work it down an
inch or two. Wipe out your brush a bit and straighten the bristles you will be
using your brush to blend and move the paint down the canvas.
Using
big “X” type strokes and very little pressure on your brush starting at the top
of your canvas working across and down, move the blue from top to past where
you hill will start. You should be painting “wet into wet” all of these words
take a lot longer to write or to read than you should be taking with your sky.
Each of these steps blend into each other so once you start this do not stop to
read because your paint is drying. If it feels like your brush is dragging a
bit you can spritz it with water from your spray bottle if you hold it back and
use a fine mist and only a couple of sprays then quickly blend in the water
into your paint and continue to paint. If you need to add more color start at
the top with the added color and blend down.
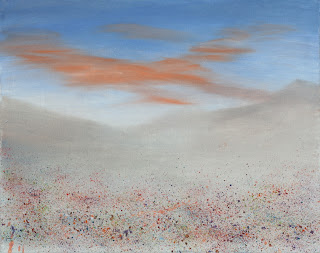
If
you want to add some clouds at this point, rinse your brush well and dry the
bristles out as good as you can, I squeegee it between my fingers to get off
the excess, then on the corner of your brush pick up a color you want for your
clouds, I put in orange clouds but if you want some white or gray or pink, that
is up to you. I am still using my blending brush, by-the-way, I still need
those soft bristles.
I
streaked the orange into the sky in the areas where I wanted clouds, and then I
rinsed my brush, dried it out and blended the clouds into the sky using the
same gentle stroke I used for the sky itself. Your sky should still be wet so
as you blend your clouds they will soften into your sky. I still used the “X”
stroke but it was a lot flatter than what I used in the sky to give my clouds a
soft streaky look.
Be
aware that I am still working wet into wet because I keep working, this is
important so that you don’t over work your painting and you keep you paint wet
for blending.
Next
I added more gesso to the lower part of my painting where my hills will be.
Work the gesso up to the bottom of the
sky area so you get full coverage. You can wipe out your brush but no
need to clean if before you add burnt sienna, a touch of blue and an touch of
cad yellow. You can blend this on your palette or on your canvas, it might work
better for you if you use your palette so your mix is fairly even. Straighten
out the bristles of your blending brush, you will be using the straight edge of
your brush to form the edges of your hills. Start your hill a bit up into your
sky by placing the edge of your brush where you want the edge of your hills and
pull straight down and form the entire top edge of your hills in the same
manner. What this does by using the edge of the brush rather than just painting
the top of the hills in one long stroke, it keeps the edges soft. Hard lines
can be very had to eliminate in an acrylic painting so we do our best to keep
edges soft. The bottom part of the hills can be scumbled in and gently blended.
Work quickly and when you have that area covered, give you brush a good rinse
and dry, then using those soft big “X’s” soften the edges between sky and hills
even more.
If
you want to take a break at this point you can let your canvas dry before
starting the next step or you can keep on going. You will need a toothbrush or
a bristle brush and all your paints out and your water. You can use every color
you own for this step and it won’t be wrong. Actually, the more the merrier too
little doesn’t do what we need it to do. This technique is a great way to do
sand and flowers and snow, your toothbrush can be a very handy piece of
equipment.
Start
by picking up some water on your toothbrush and forming a puddle in your
palette, next pick up a color ANY COLOR, and mix it well with the water. You
may need to add more water because you want this paint to flip off your brush.
You might also want to cover your sky with paper towels because this can get
messy especially if you are using a regular bristle brush. When your toothbrush
is loaded, point the bristles down and towards your canvas and with your thumb,
rake it along the end of the bristles. You should get splatters of all sizes
and shapes and that is what you want. Continue this process using all the
colors you have and cover the bottom third of your canvas with lots of
splatters. This is where we ended the day.
Try
to have your truck on your canvas for next class remember to use charcoal and
not pencil. Also make the truck big enough that is covers a large area of your
canvas, it is the focus of the painting not the hills, it will also make it
easier for you to paint. See you in class.