Monday, May 27, 2013

SPRING 2013 ACRYLIC
Project: Az. Wash

I have a couple of weeks’ worth of blogging to get in so tis will just be one blog that covers all the ground.

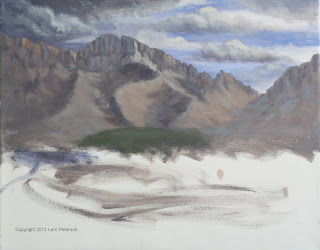
The first thing you need to finish up is the background with the cliffs and the trees on the other side of the wash, this area needs to be dry before you put the glaze over it. If you have worked on the background and want to do something while you wait for paint to dry, you can do the under painting for the wash and the foreground. You will use a #10 (#8 if you are working on a smaller canvas or #12 if you have one for a larger canvas).

The colors you will mix will be white or gesso, yellow, a tiny touch of purple and as you paint pick up tiny bits of burnt sienna to blend in as you go it should be a grayed yellowish color. The stroke you will use is a flat “u” type stroke. Start in the middle of the wash and work side to side, back to front. When you go back under the trees, if you use very light pressure and with very little paint on your brush, you can scumble this color lightly under and around the base of the trees so it looks like shadows under the trees. If you can’t see the dark color you either use too much pressure on your brush, too much paint or both, if you have, while it is still wet, you can use a damp paper towel to wipe it back and try again.
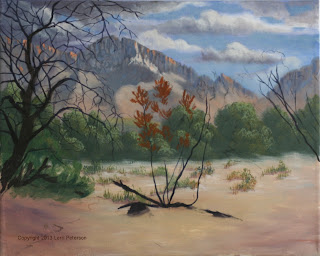
 
Acrylic - Working in the foreground now.
As you come forward with this sand color in the foreground add more purple and sienna especially into the corners. These areas will be in shadow eventually so making them a bit darker now will get the process started.

By now the cliffs and trees in the background should be dry if they weren’t already so before we move on we need to glaze that area. Remember there are two types of glazing we did before: The dry brush, more of a spot glazing you do to certain areas you want to push back a bit more, the other was an overall thin wet glaze that will push everything back. You will need to assess your own paintings to see if you need just one or both glazes. For instance: If you got your cliffs to intense in color or too dark, you might want to do some of the dry brush spot glazing to push the cliffs back. Use the thin side of your flat bristle brush in tight circles but use light pressure, you don’t want to obliterate the cliffs, just push them back so very little paint on the brush and very light pressure. Keep a damp paper towel so if it gets some place you don’t want it you can wipe it off.

If you don’t need to do that step, you will need your 2” hake or blending brush (the one with the very soft bristles). On your palette you will mix white or gesso it a tiny touch of blue and sienna and lots of water. You will end up with a dirty gray color but it needs to be very watery. Better to error on the side of too thin than too have it so thick it looks more like the fog has rolled in. Keep that wet paper towel at the ready but don’t panic, when you first apply this wash it looks way too murky even a very thin wash so let it dry before you assess the outcome. Watch for drips. You want to put this on with long crisscross strokes but you don’t want your brush so wet that the glaze runs or pools up into little almost drips that will be denser than surrounding areas when it dries, these you can smooth out with your brush with light strokes the drips you will need your wet paper towel.

While this is drying you can take the time to practice with your liner brush. The liner is one of my favorite brushes but it can be a bit tricky at first which is why I say practice first before you try it on your painting. I’ve been using this brush for a long time and I know how to make it work for me, it is also why I may it look easy but I had my struggles in the beginning also but I could see the benefits to mastering this little brush so I kept at it.

The first problem area is mixing the paint, it should be the consistency of India ink, if you tilt your palette it should do a slow run (clear water will do a fast run) but it should run. Washes and the liner brush are about the only time you will hear me say add more water but water is the key to both these techniques.

Next, loading the brush: You will need to roll the wiggle the ENTIRE bristle end of the brush in the paint to load it up properly, when you want to take it off your palette, pull and lift while rolling the brush between your fingers. This action will create a point with the bristles and now you are ready to test it out.

Hold your brush at the very end of the handle between your thumb, first and middle fingers like a pinch of salt and hold it pointing slightly down, this will let the paint refill the tip like a fountain pen. Most of the movement you will use will come from your wrist and your fingers not your arm.

Tree branches are made by first pushing down with the entire bristle end of the brush to create the fat end of the branch then as you pull to make the branch lift until you are at the very tip of the bristles. Try to see how long you can make a line and how thin you can make it, this will teach you technique and give you control of this brush. If you have a nervous twitch in your hand, don’t worry, this is actually good when doing tree branches and twigs they usually aren’t straight anyway and this tree we will be doing is very “twitchy” so consider it a gift, the rest of us have to remember to twitch a little as we move the brush.

When you want another branch or twig off the first branch, start your stroke back inside the first branch, then “branch off” where you want to start the new branch. This makes for a more natural connection between the branches, you can make funny marks or come too straight off the branch or be too thin or too thick if you start where you want the next branch so start inside the previous branch or tree trunk then branch off.

Grasses are done using a lot of wrist movement so you need to start the movement before you get to the canvas. Load and hold the brush the same way but this time start by making circles with the end of your brush. You want to get into a rhythm with the brush so when you touch the canvas you continue the movement. You want to touch the canvas on the up stroke of your circle, big circles make tall grass, and small circles make short grass, do them both. So many of you have your nose on the canvas and a death grip on the brush painting one blade of grass at a time, this will be scary for you if you try it on your painting on your test canvas you can mess up to your heart’s content until you feel safe to go to your painting. Practice with this brush before working on your painting because this is the brush you will be using for the most part.

Back to the project: If your glaze is dry and if you want, you can take your charcoal and sketch in the general area where things will go such as the tree the path and the bushes on the right side. You do not need to do a detailed drawing, just a few lines to show you where you are going. Don’t forget the green bush on the left side in front of the tree it is easy to miss. When you sketch your tree, just sketch in the major trunk and limbs it really won’t matter where the branches go so worry about the trunk not the small stuff.

In the sand of the dry river bed – if you want – you can add some bushes in a few places just be sure you aren’t adding little tuffs of grass all the same size and spacing, these are weds that grow in clumps some bigger some are smaller some touch or overlap other clumps don’t get too carried away because these are sparse in this river bed because the next rain a flash flood can wipe them all out, they are survivors.

Under paint the little bush in front of the tree on the left side with sap green, a bit of blue, purple and a touch of white (gesso), it is done the same way as the trees in the back and it should be a bit darker near the bottom so add more blue and purple (wet into wet) as you paint.

If you have a sable brush (round or flat) you can use it or a newer flat brush will be fine for the tree trunk and the bigger branches of the bushes on the right. These trees have very dark bark to begin with and are also in shadow so we can start with a fairly dark color. To get that dark color you mix your blue, sienna (umber if you have it) and purple. It should look almost black but it should be slightly to the sienna side so it is a little warm in tone. We will use this for the tree trunks and will add water and also use it for the branches so make enough that you don’t have to stop and re-mix.

To paint the tree trunk and the larger branches with always follow the direction of growth. I use my flat (#4 sable) the long way (a round you don’t have to worry just follow the direction of the growth) making short choppy strokes. This will leave a texture both visual and actual you can use later, just paint in the major parts of the tree and the branch on the other side. When you are done, add water to the color you are using and add branches and twigs to the tree. Remember to start inside the bigger branch and branch off of it and make a lot of branches and twigs. Contrary to what you might think, you actually need a lot of branches and twigs to make it look “natural” not less. Look at the photo, there are a lot of twigs and branches just try not to cover up the major cliff in the background but you do want to “frame” it with twigs. Same with the bushes on the right, there are a lot of twigs and branches. You can also add some lighter branches if you want look at the photo so see where the best place for them is.

Well, this is where we ended but I hope that you will have enough time to try and get some of this done before our last class. Most of what we need to do to finish this up involves the liner brush either twigs or grasses. Follow the photo and do as much as you can on your own and when we meet again I will show you how to finish it up. See you soon.


Saturday, May 11, 2013


SPRING 2013 ACRYLIC
Project: Az Wash
 
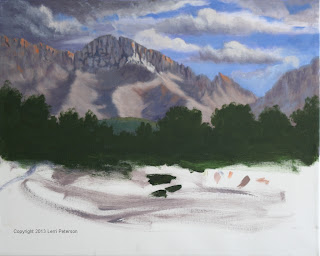
Acrylic - Made changes and adjustments also added treeline.
The first thing I wanted to do was to make any changes I wanted to make and to add some brighter highlights where I thought I would need them because when we glaze this area we don’t want to have to make any changes if we don’t have to.

I was not happy with my sky so I changed the color a bit using a dry brush and very light circular strokes to add the color to my sky. I wanted to show that you don’t have to paint out an entire area to make changes, you just need to fix what is bothering you. I also needed to add more highlights and shadows into my cliffs, acrylics always dry a bit darker than you think so quite often when you are doing highlights you think they are just the way you want but when you come back they have totally changed to a darker version. Some of that can be minimized by using less water in your paints but it will darken just a bit. I do want to note that I did work on this at home a bit but felt that what I was doing was repetitive and didn’t want to waste any more class time fixing my problems. You needed to see how I handle a problem but what I was doing at home was just more tweaking than anything else.

I also moved the closer hill up a bit so it would show behind the tree line when I put in the trees.

When I was satisfied I had made the changes I felt it needed, I put in the line of trees that are on the other side of the wash. This seemed to cause quite a few of you some puzzlement because you couldn’t see it in the photo or more precise you couldn’t “imagine” the tree line. When you are working from a photo you need to “fill in the gaps” of the information you see in that photo. For instance: If we could magically remove the cliffs from the landscape, I think it would be safe to assume that we wouldn’t see a big cliff shaped hole in the scenery, there would be blue skies or something else filling that space, the same goes for the tree line. If you were to walk through that break in the foreground bushes would you only see the few trees that are directly across from the path you are on? Probably not, there has to be something on the other side of the bushes in the foreground between the wash and the cliffs which are a distance of 10 to 15 miles of space so something has to be there. If you look closely through the foreground bushes on the other side of the bright wash, you will see dark shadows and if you follow that dark shadow down to the gap, you will see that it is the shadow under the tree line on the far side of the wash, that is how I know what is over there and why I need to paint the trees I can’t see. As the painter, you want your viewer to want to visually want to wander through your painting, even a suggestion that there is something on the other side of the wash is enough to accomplish that goal.

Back to the trees. Remember, we under paint everything with a darker version of what is there so these trees are under painted with a dark khaki to dark olive green. I used my #10 bristle brush and mixed Hooker’s green with touches of blue, purple and sienna and little touches of orange and white, just enough of these last two color to change the value because we are still working on a distant area and we don’t want to be too dark. To form the edges of the trees, I use the brush so that the skinny side is up and use the corner of the brush to form to outer softer edges of the trees. The inside of the trees it doesn’t matter what stroke as long as the canvas is covered but the top edge is critical: It needs to be soft and airy like the tops of trees and it needs to have changes in elevation and differences in size and shape of the trees. It is not a manicured hedge, give it some character. Also, at the bottom of the tree line, be sure to not stop so that you leave a hard line. Feather out the edge so it is soft and it won’t cause you problems later down the line.

Next class we are going to highlight our trees, do our glazing, under paint the wash and the foreground so please be sure that you are caught up to this point. There are only 3 more weeks for class and we have a lot to do. I would also like you to start thinking of things you want to paint so I can get some suggestions for next semester. See you all soon.

Saturday, May 4, 2013


SPRING 2013 ACRYLIC CLASS
Project: Az Wash

So far in our project we haven’t done anything that we didn’t do when we were doing the study so if you need to review what we did, go back a couple posts for any of the technical descriptions you might need, I am going to talk here about some of the other issues students were having. These issues are no less a problem than knowing how to do a technique properly and will make more of a difference in your painting than perfect technique so it is well worth the time to go over.

First off be aware of your brush strokes. Your eyes are very sensitive and pick up on even slight discrepancies, it is important that your strokes follow the shape of the thing you are painting. It doesn’t matter if it is a mountain, bird, ocean, or vase, whatever you are painting has a shape unique to it and your brush strokes need to follow the unique shape of what you are painting. This was true of the mountains in this project. Many of you were using vertical strokes all the way down the cliff s into the rugged ridges at the bottom so you weren’t getting the look of the ridges.

The sheer rock faces of the cliffs only go down about a quarter or less of the whole mountain, then it spreads out in to the ridges that make up the bottom ¾ of the mountain, this is caused by eons of erosion and rocks tumbling down and piling up at the bottom. You can see this for yourself if you pour dirt or sand from a bucket (sugar or salt will work but needs a container to pour into), the bucked it the top of the cliffs. As you pour from the bucket, a mound will form in a roughly a cone shape, if you pour the dirt down the side of a wall it will build up a wedge of dirt. Now do several pours next to each other so the cones and wedges overrun each other, this is what is happening on a much larger scale when mountains erode, this is why you need to change the direction of your stroke to get that “feel” of those hills at the bottom of the cliffs.
Shadows are another problem area for most of you, many of my students – both acrylic and watercolor – make their shadows too warm and shadows are cool both in reality and in visual color temperature. What I mean by visual color temperature is what colors do we associate when we think of heat, for instance? I doubt that anyone thought of blue or purple when I mentioned heat, you probably thought of red or orange or yellow because those are the colors of fire or warmth. If you have a room that is always too cool, paint it a warm color and it won’t feel so cold. Conversely, if you have a room that is always too warm, paint it a cool color (blues, purples and greens) and it will seem cooler. Designers know this and use it to their advantage. There are a lot of references in our language as well such as “red hot” or “so cold he turned blue” so you are no stranger to the concept, most of you who have this problem are fighting the influence of your left brain.

In your mind, you know that the mountains are all a warm earthy color so logically – in your mind at least – the shadows would just be a darker version of the rocks on the sunny side and you translate that into not using white or yellow, maybe tiny touches of blue if it doesn’t get dark enough but it still looks like sunlit rocks because it is way too warm in color. These visual clues to our viewers are how we create a three dimensional look on a two dimensional surface, it also show the direction of the light to show time of day or set a mood, it is very important. If you are painting shadows, they need to be in the cool visual range, mostly using blue and purple in your base color and white to change the value.

Almost all of you had this next problem to some extent and that is organizing the unorganized. As humans we like to have everything in nice, neat, organized groups, guess it is why I like Nature so much because Nature is chaos. The rocks on the cliffs are broken in to different sizes and shapes: tall, skinny, short, wide, missing… You name it, no two shapes are the same, yet, as I walked around many of you (and I can include myself as well if I’m not paying attention) had nice, neat pillars of stone that looked like they just came from the stone mason and set into place. I know this same thing is going to happen when we get to the trees, they will look like hedges on someone’s manicured estate and not trees that fight for survival in harsh desert conditions.

While you do not have to be exact to the photo when you are painting, you do need to be more random in the way you paint especially something like rocks that are the essence of random. Someone looking at your painting will see any repetition of shape faster than you’d imagine because it isn’t natural and looks out of place. As an artist, it is your job, even if you are painting more impressionistic, to create the illusion of Nature on your canvas and that means being aware of repetitive, unnatural shapes. Check your painting for these repetitive shapes and find a way to break them up visually by adding shadows, cracks and crevasses, or whatever it takes to make the shape look more natural. These same suggestions also go for straight lines and hard lines, they are usually not found in Nature and you as an artist need to be ever vigilant when you are painting.

We will continue on our project next time so I hope that all of you are up to this point on your own painting. For homework, I want you to be more observant to the world around you and you can do this both indoors and out. Look at the difference between shadows and lit areas, inside and out. Try to figure out how you would paint it. What colors would you use? What technique? Outside, you can do the same thing and also really look at the nature around you. Look at the different colors of the trees and how they grow. Notice the color of their trunks and branches or differences between plants and flowers. Watch the clouds and the patterns they make both in the sky and on the ground. Look at the PV Peninsula and really pay attention to its shape. If you have a camera take photos both wide images and close-ups for reference. The more you “see” the more you will understand and the better artist you will become.

I do want to thank my acrylic class for your cooperation during the filming in our class, we can only hope that it will help the art program in general to get more bodies filling seats in classes. Thank you so much.