ACRYLIC 2015 FALL CLASS
Project: Cool Refuge Week 4
This week I started
working on some of the detail of the chair, this will be a process and will
take more than one layer to do it correctly. The first thing I did was too darken
the mold behind the chair using my Hooker’s green, some ultramarine blue and a
little touch of burnt sienna to make a dark, ugly green color. If you look at
the reference photo you will see that the chair is lighter than the wall behind
it so that is what I'm trying to accomplish.
Most of the rest of the
class was spent doing dry brush. I had to dry brush texture on the chair, I
also dry brushed some of the highlights and details on the window frame and the
planter box. If you have not mastered dry brush I would hope that you would
practice before you started on your chair. It is much easier to practice on an
old canvas or a separate canvas even on paper before trying to work on your
masterpiece because if you mess up on an old scrap of canvas it won't matter
but I will hear a lot of crying and pleas for help if you start working on your
project first. I make doing dry brush look easy but if you attempt to do this
you will find out that it is not as easy as I make it look because I've been
doing this for nearly 30 years and I know what I'm doing, so please, I
encourage you to practice at least for a few minutes so you can get the feel of
the brush and how the paint is supposed to go on.
The key to dry brush is,
obviously, a dry brush but that also means that your paint should not have a
lot of water in it as well. If you rinse your brush and clean it be sure that
you dry it out completely and when you pick paint up off of your palette be sure
to squeeze near the bottom by the metal ferrule and squeeze out any extra water
you may have picked up when you were picking up paint, then squeeze the
bristles to widen them and lightly at first, go across the canvas remember to
follow the grain of the wood. If the wood is horizontal your strokes will be
horizontal; if the wood is at an angle your strokes will be at an angle. This
is important so that your wood looks like it has wood grain, your eye picks up
a lot of information and your brush strokes are critical to conveying the right
information to your viewer.
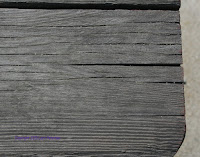
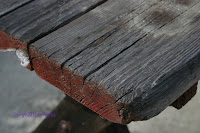
I did a demo on how to
create old wood but I have also taken some photographs of an old picnic bench I
have in my yard so that you can see what I'm talking about. I know I tell you
to look and to take pictures of your own for reference but I know from
experience that most of you will not do this, I cannot teach you what you
cannot see in your head and if you can't see it in your head you need to have
some reference in front of you, that is where photographs are important to your
art education.

 Look at the photographs
as well as the demo I did for wood: When you have a piece of wood that is cut
and you can see more than one edge the grain and any cracks that are in the
wood will change direction when they get to the end of the board. Note this on
the reference photos I have posted and understand what you are seeing. If you
must, and I do encourage this, do some sketches, this will cement it into your
head. Also I've included some photos of looking down on the wood so that you
can see it at a flat angle, notice the grain of the wood and also the texture
and the cracks in the wood the cracks are much darker than the grain which are
the dark in the light streaks that runs through the wood. The texture is caused
by weather, wear and tear so there are several values and colors that you use
to create old looking wood.
When you are working on
the chair please look at the reference photo and noticed that the back of the
chair is darker then the front of the chair, this is critical show the
difference between the front and the back it gives it depth. If you are having
problems seeing this, squint at the photograph and then squint at your chair if
the front does not come forward or the back recede you need to get lighter in
the front and darker in the back.
Try to get your painting
as close to what I have from our last class and we will continue working on the
chair and we should start getting into the detail in the flagstones and the
background next class so keep painting and I will see you in class.


No comments:
Post a Comment