Acrylics
101 – Creating Distance Using Values
As
painters we have a built in problem when it comes to creating distance and
depth in our paintings because we are trying to represent a 3 dimensional world
on a 2 dimensional surface, this is where perspective comes in and there are a
couple variations of perspective that are important to understand whenever you
are drawing or painting. There is linear and atmospheric perspective.
Linear
perspective means that objects need to be in proportion to the things around
them depending on where they are in your painting. Look at the figure standing
on the perspected lines. The lines look like they are going off into the
distance while the figure looks like a giant and one end and a child at the
other then thing is, the figures are all the same size. This is an optical
illusion because our brains know that as things go into the distance they
become smaller, when the figure stays the same size our brains go by visual
clues – the perspected lines – and obviously there is a giant walking down the
street.

 A
“rule of thumb” whenever you are drawing your design is “as things go into the
distance they become smaller, closer together, less detail, less intense in
color and greyer.” The last 2 “less intense in color and greyer” are part of
the next aspect of perspective and that is atmospheric perspective. Atmospheric
perspective is caused by all the dust, smog and water vapor in our air, it
scatters the light and certain parts of the spectrum are absorbed in the atmosphere
only the blue/violet end of the spectrum survives causing things in the
distance to take on a soft blue grey.
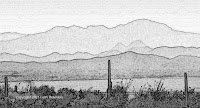
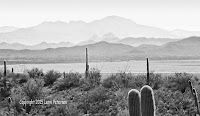
Look
at the desert photos. The black and white photo shows how distant mountains
almost blend into the sky and as they come forward they become darker until you
get to the
foreground where you can see detail, the outlined version will help
you find the different layers. The color version of the same photo shows you
how those distant mountains have only soft gray colors, no detail until you get
to the foreground. If you have not taken a basic drawing class you might want
to take one because you will learn more about perspective and it will make a
big difference in your paintings.
In
the study we did in class, we created a mountain landscape but the rules will
apply if it is a desert or prairie or seascape, if you want to have distance in
your painting you need to follow the rule of thumb I quoted above.
I
started with the sky because the sky is the furthest thing from us. Using my
#10 flat bristle brush because I wanted to cover my canvas quickly, I first
applied a thin coat of gesso over the whole sky area. The gesso will help me
blend my colors and it doesn’t dry as fast which I want because I will be
working wet into wet from this point until I get my first layer or two of
mountains, so you will need to work quickly.
While
the gesso is still wet, I took a little touch of yellow and red on each corner
of my brush and streaked it across where my horizon will be and lightly blended
it into the gesso but only going up about a quarter of the way to the sky. This
is optional the horizon can be almost any color depending on time of day,
location and weather; this is just for practice purposes. I quickly rinsed and
dried my brush then picked up my ultramarine blue with a touch of purple and
sienna on the corners of my brush and applied these colors across the top of
the sky area. Using a long crisscross stroke, I started blending the blue color
down toward the yellow/red but stopped just short of the warmer colors, then I
rinsed my brush well and dried it off, then going back into the yellow/red
color and same long crisscross strokes I blended the lighter color up into the
blue color using very little pressure on my brush. What I want is a soft blend
so you do not see where one color stops and the other begins. Wipe your brush
out often but blend the both from the lighter color to dark and dark into
light. If you need to spray your painting with water so the colors will blend,
hold the spray bottle out about a foot and lightly spray once or twice and be
sure that you work the water into the paint or it will leave dots.
Get
your sky blended as best you can and if you want to you can use your soft
blending brush and VERY LIGHTLY go over the sky to soften the colors even more.
3 hairs and some air as Bob Ross would say, you barely want to skim the
surface.
The
next thing I did was to put in my first layer of mountains so on my palette
with my #10 bristle brush I took gesso, ultramarine blue, a touch of purple and
a little touch of sienna to grey the color to make a soft blue/gray that is
slightly deeper than the sky. To create the top edge of my mountains (look at
the desert photo again and see what a mountain top looks like), I used the
whole flat edge of my brush and pulled down as I went across the canvas. This
will create a soft edge and by working in the wet sky color it will further
soften the edge. Don’t worry if it blends slightly with the sky that is a good
thing. The body of the mountains you can scumble or use crisscross strokes to
fill it in.
The
next layer of mountains, while the paint is still wet from the first layer, in
the same pile of paint you mixed for the first layer you want to add a bit more
blue and sienna to darken it, you color should just be a shade or two darker
from the first layer and it goes on exactly the same using the edge of the
brush and pull down. Then let it dry when you are done.
The
next layers are done wet on dry and since they are much closer you will be
adding some Hooker’s green to your mix. Remember, you can do as many layers as
you want or need but each layer as it comes closer not only gets a bit darker,
but also starts to show color. Look at reference photos and when you are out in
nature and observe when the colors start to show. For our study we only did 4
layers.
To
create the closer mountain range, I wanted to suggest tops of trees in the
distance so this time instead of using the whole edge of the brush, I used the
brush with the corner at the top to create the ridge and the suggestion of
trees using a very vertical stroke and filled in the rest of this layer with
this vertical stroke.
This
was basically the lesson though I did put in a few closer trees, I think we
will do a lesson on how to create life-like things and pine trees will be one
of them. Try to get these layers down so you understand them and have a canvas
ready for trees and rocks, maybe some flowers and wooden buckets. See you in
class.
Acrylics
– Garden Fantasy Week 7
These
last couple of weeks was for finishing up your project so you are happy with it
and to fix things you may not be so happy with and I found something I was not
real happy with so I changed it.
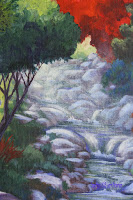
I
didn’t like the rocks in the upper part of my stream because to me they seemed
too hard edged for where they were I the painting but rather than painting them
out and doing them over again I chose to go over them with dry brush and create
a mist or haze over them like sunlight coming through the trees and this did
what I needed it to do.
 Using
my #6 flat bristle brush, I took gesso and a little touch of yellow to tint the
white and enough water to thin it down so it was just a glaze, making sure I
didn’t have too much water in my brush, and starting at the tree top next tothe stream I first started with small circular scrubbing strokes and I moved
away from the tree it was a combination of the circular strokes and diagonal
strokes like a sunbeam coming through the trees. I went all across my stream,
rocks and parts of the plants on the other side to soften what was there and
create more depth in my painting. I did this about 3 times, letting it dry in between
each application so I could see what it actually looked like because it looks
totally different when it is wet than when it is dry. YOU DO NOT HAVE TO DO
THIS only if you feel your painting needs it.
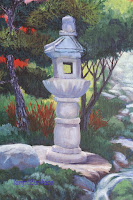
 I
also worked on brightening some of my highlights and I started detailing the pagoda looking for the highlight and shadow areas. Whatever color you painted
your pagoda with the shadow color will be that color plus some blue and purple
just don’t get it too dark because there is a lot of reflected light, the only
real dark area is the shadow on the inside of the window and at the very bottom
where it sits on the rock.
Unfortunately,
as I was working on mine, I saw that I had a really bad distortion in the upper
part of my pagoda so I needed to paint it out to get pine tree color behind and
will try to get it painted back in before our next class.
Another
thing I did is at the base of the pagoda and behind it I added some spikey
red/orange plants. There are some types of flax that are near that color but
mostly I wanted to repeat tome of that color I have in other places in my
painting.
On
some of the rocks near the front of the stream I added some ground cover coming
in between and over some of the rocks to soften and settle them down.
I
do have some work to do to finish up my painting but at this point in time it
will be your choice as to how you want to finish yours. Do the best you can and
I will see you in class.


No comments:
Post a Comment