ACRYLIC
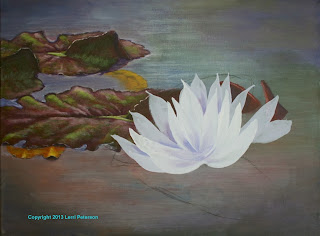
CLASS PROJECT: Water Lily Week 5
The
last class we finally got to add the actual water lily to our painting. While
there wasn’t much instruction, it did take time and, for most of you, practice.
While I really don’t want to say that something is “hard” because I do not want
you to set up barriers before you even begin, getting the feel for creating the
flower petals does take a certain skill, as many of you found out it isn’t as
easy as I make it look but you must remember I’ve been doing this for a few
years and, yes, I do practice it if I feel I need to refresh those skills.
The
first thing I did was to add a bit of the sheen back on to the water that
disappeared when I darkened the corners last week, again, this is a dry brush
technique but this time I used the 2” haki/blending brush. I tried to keep most
of the “sheen” near the center so I didn’t lighten my corners too much,
however, notice I didn’t paint a visible ring around the center, it should just
fade to the corners. I used the same color as before white/gesso with a touch
of the gray color I still had from the water, I thinned it down with water,
removed the excess water from my brush with a paper towel and lightly streaked
it across my canvas. I had a damp paper towel handy to wipe the color off of
areas where I didn’t want it, then let it dry for a few minutes.

For
the flower, you do not need to draw on a detailed flower, if it makes you more
comfortable then, yes, go ahead and do the detailed drawing with your charcoal
but don’t be married to the drawing. With my photo in hand, I just did a simple
shape where I needed my flower to be, keeping in mind that the flower is a
slightly tilted cup shape, it faces back into the painting and that is
important, you don’t want the flower looking out of the painting.
If
you don’t have any of the gray from the water left you will need to mix up some
more (gesso, blue and sienna keeping it to the blue side), if you still have
some gray you will need to add more gesso/white and a touch more blue and enough
water to make it a very creamy mixture but not runny. It should be a couple
shades lighter than the water but not white, remember you need to have contrast
so that white will look white and even though this is a white flower, if you
look at it closely only the highlights are actually white all the rest of it is
shades of gray.
For
best results, you will need to have your sable brush. I was working on a large
canvas so used my #10 (wished I had a #12 but made do). The first thing I did
was to load my brush by running it back and forth across my paint to not only
load paint on both sides but also to bring the end to a fine chisel edge. You
do not want globs of paint but the brush needs to be well loaded. Start the
stroke on that chisel edge and as you start to pull it is a combination twist
and push motion. Many of you got the twist part down but didn’t get the push
down part and your strokes looked like snakes so remember to push. Twist back
up to the edge and lift to complete the petal. Remember that all the petals go
to a central point in the flower so whichever side you are working on be sure
that the petal ends in the same place.
I
painted in the very outside petals first then to do the next row of petals I
added a bit more white/gesso to my color to make the paint a bit lighter before
adding the next layer. I only did the back and the sides of the flower, I will
do the front after I add the yellow center.
I
did do some shading to my flower and if you feel confident you can do it also,
I just wanted to get some busy work done so the painting could progress, I will
show this in class next time. The shading was the base gray color and I added a
touch more blue and a tiny amount of purple. Starting between the petals near
the base, I separated the petals by painting the petal BEHIND the other. This
is called negative painting and while it is the bread and butter of
watercolorists, it is also very useful in other mediums. The darkest part of
any flower is going to be near the center and will fade as it comes into the
light, just keep this in mind and PLEASE have you reference photo right in
front of you as you are painting this, all the information you need is in the
photo.
Do
not worry about the shadow, I have not started it yet, we may get to it next class.
Try to get your painting to this point and I will see you all soon.

No comments:
Post a Comment