Acrylic Week 2 – Snow Demo
This week we got started on our project which I will get into later, I do want to mention a bit more about the tree stump and snow to finish it up and to detail the use of the liner brush.
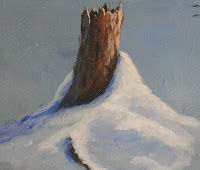
 When highlighting the snow around my tree, I kept in mind a couple things: First that it is snow. I know that it may seem an obvious statement but sometimes we get so wrapped up in painting we forget exactly what it is we ARE painting. Snow is soft and fluffy and has no hard edges; it clumps up and drifts over things which brings me to the next thing I want to keep in mind is what is underneath the snow. There could be rocks, roots, grasses…anything you can think of that might have been there before the snow started to fall. Make up stories in you mind about what is there so as you are painting the highlights you remember that the top of something gets more light and the space between stays in shadow. This also affects the strokes you make: If it is going over the top of something the stroke will be convex (upside down "U" shape), if the stroke is going down the side or in a depression, it is going to be a convex stroke ("U" shaped stroke). Our brush strokes tell our viewer a lot of information so they shouldn't be taken for granted.
With this in mind, using my #10 bristle brush I mixed white with just a touch of orange to warm it and using what is called the dry brush technique, which means that I have thoroughly dried my brush, loaded it with paint but have wiped the excess paint out before going to my canvas. Then using either the flat side of the brush, I start in the area where there would be the strongest light and scrub in this color. The harder you scrub, the more filled in the area will become, this is good to know when you are shading so you can get a nice graded look to your transitions from dark to light.

The liner brush will be used in a bit but I want to go over it now so you have a chance to practice with it. This little brush can be a blessing and a curse and that just depends on how much practice you have with it so take the time to get comfortable with it before you use it on your "masterpiece".
Your first hurdle with this brush is loading it. Most of the time you will here be admonish you not to get too much water mixed into your paint, with this little brush it is just the opposite: You need a lot of water to make it work correctly. The paint should be the consistency of ink. If you tip your palette it should slightly run. Next is loading the brush. You want it full of paint so really work all of it into the paint not just the tip. As you lift it off your palette, roll it in your fingers to create a point. Hold the brush at the back of the handle and the bristles pointed slightly down so the paint will flow, now you are ready to start.
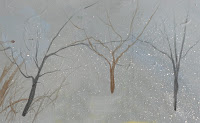
To create a thicker line, you press harder and are on more of the bristles, for smaller lines you lift the brush to the tip. This is how you start a tree. Press, pull, lift and drag. If your hand is a bit nervous you have an advantage when making trees because trees have all kinds of bumps and twists, these aren't fishing poles, these are tree branches and twigs. To make branches off other branches it is easier to start within the tree or a branch then "branch off" with a new branch or twig.

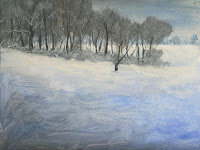
The first thing I did was determine where my horizon should be, which was about a quarter way down from the top of the canvas. With my soft vine charcoal I drew a line across the canvas at that point but I didn't get out a ruler, there was no need, but that was as much drawing as I needed to do at this point.
Next I applied gesso to what will be the sky area – that quarter space at the top of the canvas. I was using a #10 bristle brush to apply the gesso and the gesso should be thick enough that when you touch the canvas your finger tip is well covered, we are going to mix into this so before it dries, on the same brush, on one corner pick up some blue and on the other corner a little burnt sienna and streak it across the top of your canvas. Once the paint is on, use big "X" stokes to work it down to the horizon, the color should lighten as it gets near the horizon and that is what you want. I did switch to my soft blending or haki (pronounced Hockey) brush to finish blending the sky because the soft bristles don't leave as many marks as the hard bristles. Make sure that you have squeezed all the water out of this brush because it can hold a lot of water. I use the big X stroke with this brush as well but I was barely touching the canvas. Again, practice.
While the sky is still wet I did the distant trees. I went back to the #10 flat bristle brush and on my palette mixed white with touches of blue and tiny touches of sienna to make a cool gray color which was slightly darker than the sky behind the trees. To load the brush I tapped it straight down onto the palette rather hard so that the end got really scrunched up. If you look ant the end it should be a twisted and funky, great for making tree tops. Right along the horizon I gently tapped this color into the wet paint of the sky varying the size and shape of my brush strokes all along the length of the horizon. This color shouldn't bee too dark, if it is pick up a little white or gesso on your brush and just work it into the tree line.
Next I under painted the rest of the snow area using the same brush, same colors and starting right under the tree line, I scrubbed in this color with a scumbling stroke. You can do what is called "brush mixing" by picking up the different colors of paint on your brush and mixing them on your canvas. This is actually much better than mixing on the palette because it gives more variation in the color which is a good thing. As you come into the foreground, use less white – don't eliminate it just use less – and add more blue, with touches of brown and purple. The corners can be the darkest areas just be sure to cover the canvas well. Now it all needs to dry for a few minutes so now is a good time to practice your trees which are coming up.
When this under painting was dry, I needed to start highlighting it. On my palette I was still using my #10 brush but if you feel more comfortable with a #6 or # 4 for this it is okay, I mixed my white with a tiny touch of orange just enough to tint the white. Always make sure that your brush is free of excess water before you start mixing color or the color can become too thin and won't cover. I wiped the excess paint from my brush and just under that line of trees in the distance, I dry brushed this highlight color on to the snow area. Remember you don't want to cover it all up and think mounded snow so make little slightly, rounded strokes. As you come forward, lighten the pressure, more canvas will show and that is what you want to suggest a hillside.

Notice the pockets of the blue under painting showing through.
If you need to sketch in the area for the middle ground tree tops, use your soft vine charcoal to indicate where you will be painting. This is just a suggestion so no detail and blow off the excess charcoal dust when you are done. If you need to make changes, use a wet paper towel to wipe it off.
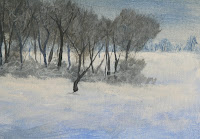
Still using my #10 flat brush, I wanted to mix a darker, grayer color so again I used my blue and sienna and enough white to gray it and like the background trees I loaded my brush up by tapping straight down to mess up the end and using a similar tapping created the tops of the trees and also the bushes and bramble at the bottom of the trees. Be very conscious of the fact that all of these are natural trees and they grow at different rates so are different sizes, same with the under growth, vary the sizes and shapes. Also note that in the upper left hand corner the trees go off the canvas so it can be filled in pretty solid.
While that was drying, I started highlighting the area just in front of the middle ground trees. Again with the same brush and mixing the white with a touch of orange, I dry brushed in my first layer of highlight. I didn't come too far forward, I will do that later when I dt my other main trees in but I needed to get it started.
Now for the tree trunks and branches. If you don't want to do the very distant trees, that would be okay, if you do, with your script brush you will mix a blue/gray color that is just slightly darker than the color that is there (white, blue and sienna), remember lots of water and just suggest the trees trunks and a few major branches, they are too far in the distance to see much detail.
In the middle ground trees you will use a much darker color. Little or no white, blue sienna and a touch of purple this time to make a dark color. If it seems too dark, add a little gray from your palette rather than dipping into the white or you could get lighter than you wanted.
When you are making your trees remember to vary the size, the shape and the placement. Thick trees next to small trees. Trees that lean. Trees by them selves. And also that they are all behind and in the undergrowth. Don't forget the branches and don't get carried away. It can get to feeling so good that you do more than you should, you want to see some of the snowy hillside behind this clump of trees, it will give depth to your painting. Change the color as well by adding touches of white to make grayer tree trunks or branches. When you are done, go back to the bristle brush, add a touch of white to the color you were just using to make a lighter gray and similar to the technique you used to apply the darker grey, lightly tap over some of the branches and trunks. Note the words "lightly" and "some" this is just to make the trees look like they belong in that clump and the gray color is part of them. I also added a bit more white with my liner to make the brambles of the undergrowth and some of the snow covered branches of bigger trees.
Depending on how fast the class works next week, we should get this done during the class time so start looking for something you want to work on, I will give demos on various things in the coming weeks and some of what I demo depends on what I see you working on. Keep painting and Ill see you in class.

No comments:
Post a Comment