Tuesday, July 24, 2018

Summer 2018 Acrylic Class

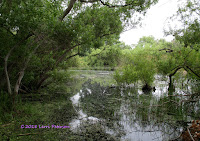
Acrylic Class Project: Marsh Madness Week 4

This week we really started getting into detail. Starting with the trees on the left, I made a highlight color of burnt sienna, a little blue to grey it and white (gesso) to make it lighter, then I took my #4 flat sable brush, so I would have more control, and using the very end edge created a series of marks going up the trunks to suggest the bark of the tree. Do not cover the whole trunk with this color, the darker previous color becomes shadow and texture so leave some of it. 

The big tree in the back as well as the smaller trees in the back are the same colors, same technique but I used very little gesso to keep the color more towards the sienna side. Look at the photo and adjust your colors accordingly.

Next we added smaller branches to the main branches with the liner brush. This liner brush is a fun little brush and it can do some amazing things but you do need to practice with it if you have not used it much.


First you want to dilute your paint until it is very ink-like then fill the bristles to the metal ferrule by wiggling it around in the ink-like paint. As you lift off your palette, roll the brush in your fingers so it comes to a point. Hold the brush at the very end and slightly down so the paint will flow from the bristles. If your paint is too thick it will not flow so you will need to add more water. If you press the bristles to the paper it will leave a fatter mark, as you drag your brush across your canvas gradually lift it up to the tip of the brush as you pull until it lifts off. You should have created a line that starts thick and tapers to nothing, that is your first branch. To create branches off your branch, if you loaded your brush correctly you should still have paint for several branches, start back in the fatter part of the branch you just painted and as you pull and lift, go off in a different direction. Yes, I make it look easy because I have been doing this for decades but I also did a lot of practice when I was learning how to use this brush and I watched others use this brush, it will come IF you take the time to practice.

I actually need to had more smaller branches, but for now, this is good. I want some of them to overlap the sky in the background because it was a big uninteresting negative shape, the branches and leaves will break it up in to smaller more interesting shapes. The dark color was a mix of sienna, blue and a tiny touch of purple.

I used that same dark color to add the twigs and branches to the bushes on the right side, I also used my liner brush to create some reeds and grasses coming up out of the water using various greens, light to dark, but as I looked at it I realized I need more reflection in the water from those bushes, so some of them may need to be redone next week.

Another thing I did was mix a color similar to the hazy sky just above the trees and dry brushed that in behind these bushes for a couple of reasons: One, to repeat the sky color in the water and two, to make the area behind the branches a bit lighter for the contrast.

On the left side I used the dark color to make some reflected branches in the water. I also started something in the water that I will do more of next week and that is to put a glaze over the water to create a sheen to it.


I also realized that I hadn't put in the dry areas in the back part of the water. I'm not sure what it is exactly, but I think it is where the water is receding and high spots are starting to show. I used a mix of sienna, a touch of blue to grey it and gesso to lighten, the with a very dry flat bristle brush I lightly scrubbed the dry areas in using flat strokes the keep them looking flat. I also reflected some of the lighter green from the tree line in the water between those dry areas.

This is where I left off in class. I may be able to finish this next week because I am really getting close to being done. I have some reflections to put in, some weeds, a few leaves and branches to add along with some final highlights and shadows but really, not that much - at least for me. We still have a month to go so don't feel rushed to finish, I will be doing demos as needed once I finish so there is still a ways to go before we can put this semester to bed. So keep painting and I will see you in class.

Saturday, July 21, 2018

Summer 2018 Acrylic Class

Acrylic Project: Marsh Madness Week 3

This week I started out by under painting the tree trunks in. I will do more work on them later using the liner brush but because these are substantial trunks I used my #6 flat SABLE brush rather than the bristle brush because it stays together and I have more control over it.

Have your reference photo out - the actual photo or the marsh, not something I did in class - and look at it before you start painting. It might also be a good idea if you can bring it up on your computer and really look at it before you start enlarge areas so you can see what is really there, phones and photos don't always give you the whole picture. 

I did the darker trees first with a mix or burnt umber (burnt sienna will also work), and blue. When those trees were in, I added a little touch or gesso (white) and a little more sienna to warm it up slightly (should be a warm gray color) and under painted the closer, lighter tree trunks. Do not go for the final color of these trunks yet, we will get to that later, this color then becomes the shadows and texture of the tree trunks, it is important.

To the water, I added reflections of the brighter highlights of the background tree line. Reflections are a bit darker than what they are reflecting so I used sap green and yellow and used the side of my #4 flat bristle brush and pulled straight down and lightly went across after. This is a dry brush technique so you don't want to have too much paint or water on your brush and use very little pressure with your strokes.

I added the bushes on the right using Hooker's green and blue for the under painting,  added mid tones by adding yellow to that color,then highlights using a mix or yellow and sap green.  Each time I leave some of the previous color because that now becomes texture in the smaller bushes For this I was using my bristle brush. Then I used that dark mixture I used on the other trees to add the bases of the bushes going back to my sable brush. I have some things I need to do in the water behind these bushes so I will put in the branches later, I just needed to see where these went.


I also started some of the reflections from these small bushes and their bases with the same green, the same brown and same technique I used before, pulling down to create the reflections. There is more to do, but this is a start.


This is where I left off, try to have your paintings to this stage if you can because we will be working from there.

Keep painting and I will see you in class.

Tuesday, July 10, 2018

Summer 2018 Acrylic Class

Acrylic Class Project: Marsh Madness Week 2

Last week's stopping point.


Remember I said last week that I needed to make changes to what I had done in class (smaller image), well, the first part of the class I spent changing the things I didn't like. I made a soft orange color with gesso and a tiny touch of orange, to re-shape the tree line in the back using the dry brush techniques (little paint or water on the brush) and scrubbing it on using little circles to create a bit of haze behind the trees and blending it up into the sky (use less pressure). this way I didn't have to worry about matching the blue of the sky and it added a bit of warmth into the painting. I may do more of that later.

Next I added the big tree behind the trees that are along the water's edge. It is a more blue-green tree from the ones in front of it so I used Hooker's green, ultramarine BLUE, a touch of burnt sienna and a little gesso. Leave some of the sky showing through near the top, Near the bottom you can add a bit more blue and green to make it darker and it can be more dense, also, you can use this darker color to shape the trees in from of this new tree, that is called negative painting.

When these were dry, I went back in and highlighted the trees: A lighter lime green for the trees along the water (sap green, a little yellow and a touch of orange and white) and a lighter version of the big tree (add yellow and a touch of white to the colors you used to create the big tree)

That got me caught up and things fixed so I could start moving forward.

I have been using a #6 flat bristle brush to do all of the work so far. the bristle brushes are the workhorses of acrylic painting because of all the scrubbing we do, I will continue to use the bristle brushes for most of the rest of this painting.

Here I mixed a dark blue/green using the Hooker's green and blue with a little touch of purple to create the dark reflections in the water and the dark in and under the tree line. When the dark color was dry, I used a medium lime green (same as above just no white but a touch of blue) to suggest limbs hanging over the dark areas under the trees.

In the water I scrubbed in that dark green color using the dry brush method (little paint or water on the brush) to create some of the dark reflections. When working on water, your strokes need to be horizontal or parallel to the top and bottom of the canvas so it will look flat. If you have reflections n the water, after you scrub them on parallel, you can lightly pull straight down, this will give the effect of movement in the water.

Be sure you have the reference photo IN FRONT OF YOU, not a photo of my painting because the best information you have is the photo, if you were working outside, the real thing would be your best information.

Look at the shape of the reflections and try to do your best to recreate them. they do not have to be perfect and if need be we now know how to fix something so just get it in as best you can.

The last thing we did was to add some of the dark foreground leaves where the trunks are going to be coming out of the water.

Yes, you will be covering up some of that background we have been working on bit it needed to be there so you can leave holes in the new color (same as we used in the water, just put it on a bit thicker), and it will look like you can see through the trees. 

If you want, you can add blue when you are working in the area near the bottom of the trees where it is naturally darker and a more solid color and you go up into the top of the trees, add more sap green instead of the blue though you want to keep it on the cool (blue) side for now. Remember to leave holes near the top and  "flip" your brush to soften the edges of the dark and create clumps of what will be leaves. You DO NOT have to do leaves yet, we will get to them, this is just the under painting for them.

I know it is a lot but this is going to start coming together in the next class or two, so hang in there, keep painting and I will see you in class.


Wednesday, July 4, 2018

Summer 2018 Acrylic Class

Summer Acrylic Project: Marsh Madness Week 1
(Note: Apparently Google has added some kind of notice regarding the collecting of information, cookies and things of that nature, I only add links to the picture pages, if any info is collected it is Google not me because I wouldn't know how to do it in the first place, let alone use it. Just an FYI.)


We started our class project this past week by getting our background in
(Sky and starting the water) and some of the background trees, not a bad start until I got it home and looked at it. First the background.

In acrylics you want to start from the furthest thing to the closest or the thing that is under everything else. Since the sky is always going to be the furthest and the water is behind and below most other things in this painting we start there, first the sky.

I lightly sprayed the sky area with a couple spritz from my spray bottle then coated the sky area with gesso. Gesso is slightly opaque and it also takes a bit longer to dry then say titanium white so it helps when we are doing large areas so they stay workable for the duration. It also is what I use for white so it will lighten the colors I blend into it, if I wanted a color to stay dark I would not use gesso. In this instance I do want the sky to be a medium light gray/blue

I used my 2" blending brush to do both the sky and the water because it helps me get it done quickly as well as allows me to get soft blended areas because of the goat hair used in the brush. Be sure that you get most of the water out of this brush before you load it or it will thin down your colors too much. I squeegee it between my fingers after I rinse it out. 

After I got the sky area covered in gesso, I picked up ultramarine blue and a very tiny touch of burnt sienna and even tinier touch of purple while the gesso is still wet and blended the colors into it. You want the sky to still look blue and both the sienna and the purple are very strong colors so maybe 5 to 1 blue to sienna and 8 to one blue to the purple. You should have a soft blue/gray, if it looks to brown or purple add more gesso (white) and blue to get the color you want. Be sure to cover the canvas all the way behind the trees it won't hurt anything because we can paint right over the dried paint.

The water was done in a similar way except I didn't start out with gesso because I wanted it to be darker. Still using the blending brush, I sprayed the water area with my spray bottle and smoothed it out with the brush then picked up blue on one corner and little touches of sienna and purple on the other and applied it to my canvas with long flat strokes. As well as reloading with the blue, sienna and purple I occasionally picked up a little gesso as well to work it onto the canvas. This is called brush blending and it give you an uneven blend which is what I want in this area.

I then mixed up a dark green with my Hooker's green, blue and a touch of purple for areas in the water that will be the dark reflections. Again, I used a long, flat stroke to add this color as well and to blend into the blue areas a bit but I also, pulled straight down with my brush, this starts the reflection process in the water.

This is the point where I went off course. Talking and painting are not necessarily good things to do at the same time and because I am off to the side, I am seeing a distorted view of my canvas, I also get so focused on what you are all doing I just don't see something until I get home. That is what happened last class. Even though some were questioning me about it, I couldn't see it until I took it out and looked at it and knew immediately there was something wrong. So you will get to learn from my mistakes.

That is one of the things I like about acrylics, is it is so forgiving, I am going to have to make corrections to most of the treeline so if you followed me too closely, you may need to do what I will do in class, it will take a few minutes but you will learn that you can fix almost anything with just a bit of patience and paint.

Until then, keep painting (on something else) and I will see you in class.