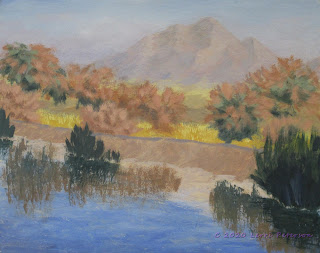
 This week we fine tuned our under painting before starting on detail. I wanted to add a bit more haze to the bottom of my mountain before I got started on the trees. I used my #6 flat bristle brush and did a dry brush glaze of blue, a touch or sienna and a touch of alizarin and water to make it thin and glazed right across the bottom of the mountain. You do not have to do this if you don't want to, I just felt mine needed a little more.
Next, I made a gray in that same batch of color I just made adding more blue and sienna along with some gesso to make a light gray to add to the top of the levee, this creates the asphalt path on top of the levee. You can add this with a sable brush if you want.
I then added some more highlights to my trees with my bristle brush. The light tan colors are sienna, a touch of orange and white the light green color is Hooker's green, a touch of sienna and/or orange and white.
Be very light with pressure on your brush when you are adding the highlights, this is a dry brush technique.
If you have to, you can go back and add some darks. You can get carried away with highlights then lose the darks, but you do need the dark to show the light.
Next I added detail to the dirt of the levee. Near the water, the dirt is darker because it is getting wet from the water. I started out using burnt sienna, a touch of ultramarine blue and I little gesso to make a cool gray brown. This went all along the levee next to the water.
I was using a wet into wet technique so I was working rather quickly, picking up touches of white and blending it into the darker brown as I moved up the levee with my brush as well as picking up more color from my palette and mixing touches or orange and white as I painted, this gives a variation of color and a more natural look to the dirt. near the top it is very light because the dirt is very dry. And remember to follow the angle of the dirt when you are working on the levee.
The dark color right at the waterline is blue, sienna or umber and only a very little gesso so it stays dark. This I added with a round sable brush to create the "overhang" where the water erodes the dirt. This is not a straight line, it follows the curves of the way the dirt falls from the levee and it will even be hidden in places where dirt has fallen in front of another part of the levee.
This is where we left off in class. Please take the time off to get caught up because from this point we will be starting on the detail so we can get this finished before the end of the semester.
Keep painting and I will see you in class.


No comments:
Post a Comment