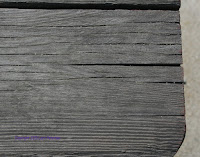
I forgot to take photos as I was going in class, just so you know, I worked on the table top and got it to this point before I added the basket and apples. While this is far from the finished look I want for the table, it was to a point I could add the apples and basket.
I want you to see that I added several more layers of paint using the dry brush technique. I want this to look like an old beat up table so I am adding other colors such as blue and green as well as, yellow and orange. There was also gesso to change the value of the color to add sunlight to the colors.
Because I am not going to use the table in the reference photo for the table I want in my painting, I may need some other reference photos to help, this is why they are called "reference" photos. You, as an artist, can change any part of a photo to make it your own. A photo is just guide, a starting point, it is not an image set in stone, the art police won't come and haul you away if you choose to do "your own thing" because that is what art should be and I want you to get comfortable exploring these changes.
I added a couple of images that I could find that are kinda where I am going with the look of the table in this painting. I do want them to have a warmer, more colorful look but I want them to look beat up and rough. You may want to look for your own texture or even a table cloth if you want.

Once I had the table close to where I wanted it, I sketched on my design with white chalk. You can also use charcoal and remember, it doesn't have to be perfect.
When you are adding the apples do not be afraid of overlapping the apples with each other or with the basket. It is a common thing to want to keep everything from touching but that is a human thing, Nature isn't like that, things touch and overlap; you have things in front and behind, stacked on top of each other... Those are things you have to be aware of as an artist when you are designing your paintings and it isn't as simple as it sounds because we line things up almost instinctively, just be aware that it can and does happen even to the most expert of artists.
I was using my #4 flat bristle brush and used my reference photo as my guide. The basket was under painted with a mix of colors: I mixed sienna, with a touch of blue and gesso to make a warm gray color. Mix the color a bit on the dark side first then on one part of it you can add more gesso (white) to lighten the color. I added the white while I was painting (called brush mixing or wet into wet painting) starting in the darker area under the basket. The inside of the basket was the same color but with more blue and sienna and I painted well into where the apples are so I was sure that I had the basket color behind the apples. The lighter color around the top of the basket and the handle is just a touch more white and you can add a little orange too if you want.
When the basket was dry, I sketched in the apples and I added an apple towards the back so I didn't have a straight line across the top of the apples in the basket (see the above comment about lining things up) even though this time Nature did it, I didn't like the evenness of it, so I changed it.
To under paint the red apples, I used the napthol red - cad red will work also - my alizarin crimson and to make the alizarin darker, I added blue. You can use a sable brush if you want for the apples, it might be easier to control.
The key to under painting the apples is to reload often. When you try to stretch paint to cover an entire area, it becomes transparent, that is the nature of acrylics or if you use too much water. You want the paint to be about the consistency of soft butter so it will slide off your brush. This takes practice to judge your paint but if you see through your paint you need to figure out what you are doing.
I know it is very tempting to slide your brush around to fill in the apples but you get better results if you scumble the paint on loosely following the shape of the apples. Fill in the spaces between the apples in the basket with color because there are shadows and more apples you can't see under the ones you can. Don't worry so much about individual right now, that will come later, you want to get them all under painted and you can sort them out using the lighter color to suggest where the light is coming from. Look at your reverence photo for this information (hint: the light is coming from the right as you look at it).
The red apples needed to dry before I add the green apples so this is where we stopped for the day. Try to get your painting up to this point if you can and we will continue from here.
Keep painting and I will see you in class.


No comments:
Post a Comment