Friday, October 12, 2012


Fall 2012 Acrylic Class – Scotty’s Truck Week 3

Once your truck is under painted you need to start the highlighting process. The problem most beginning students have is they want to go to the final highlight straight out of the gate when there are usually several more subtle layers before you get to the final highlight. On this truck there are shades of orange, yellow and red that need to be dry brushed on to get the truck a more rusted look, you can start with the base color you mixed up if you have any left, or just use burnt sienna with touches of the above mentioned colors, the key is to “dry brush” the highlights along with some of the darker areas and shadows.

The newer students in class may not have heard the term dry brush but it is exactly what it sounds like: A brush with little water and little paint on it. First, if you have washed or dipped you brush in water, it needs to be dried really well, if you need to add touches of water to your paint and you use your brush to add and mix the water into the paint, squeeze the bristles of the brush with a paper towel before loading your brush with color and again after you have loaded the color wipe the brush on the towel to remove any excess paint, there should be very little paint on your brush.

With you brush now loaded, start in the lightest areas with this color and work out. Use very little pressure on your brush when doing this technique, the harder you push the more paint will come off and you want the color of your under painting to come through. Also, use all sides of the brush and move it around in all directions like a scumbling stroke as you follow the form of the part you are painting. The size and type of your brush matters here, you may need to use a smaller bristle brush if you are working on a smaller sized painting. Be sure you are using a bristle brush because a soft sable not only won’t work very well, you will destroy the brush using it to dry brush.


Before you get too involved with details on the truck there are a couple of things you need to consider, the first is putting the shadows on the ground under the truck and the second is adding some things in the background like some rocksand or bushes in the background. If your truck fills up most of your canvas, this may not be necessary but if you have space around the truck like I have, you might need something to set the truck in its environment. I used a slightly darker version of the ground color which is yellow, white and touches of purple to give me a warm gray rock color. While it was still wet, I also added tiny touches of purple or orange or yellow or white, just to give it some life, mixing the color right on the canvas.

The wood frame in the cab has both shadows and highlights visible but just like the rusted parts of the truck it will look best if you dry brush color on but this time using a small bristle brush and making strokes that would follow the natural grain of the wood. The colors are similar to what you used for the under painting to make the color darker add more blue and purple maybe touches of sienna to grey it or touches of white to lighten the shadow color, to make a light color blue and white.

Depending on where the class is at the end of next session, we may finish this project in class this time. If you feel you are getting close to being done, please have another project of your own to start with you, I will do mini demos for specific needs. See you all in class.


Sunday, October 7, 2012


FALL 2012 ACRYLIC CLASS – Scotty’s Truck Week 2

Thanks to Gary we found out that this is probably a 1928 Ford dump truck. Leave it to a guy to be curious about an old rusted out truck. Thanks Gary, I do appreciate your efforts.

In the last class we under painted the truck and the rock, as always, we start out with a mid-tone version of the final color to that we can add other colors to make it lighter or darker. My basic mix of color for the rusted parts of the truck was burnt sienna, orange and a touch of purple. That is a good basic rust color. If you need to make it darker you can add blue and purple to it if you want to change the sun lit color a bit you can add more orange, or yellow or red.

When you under paint the truck, use a brush that will fit the truck size you are working on. I’m on a 16 x 20 canvas and my truck is fairly large in the frame so I started out with a #6 flat sable and went down to a #2 flat sable for the finer detail, if you are working on a smaller canvas, your truck it going to be smaller as well. You may want to start with a #4 either a sable or a bristle and use a small round brush for the detail, don’t try to use a jack hammer when all you need is a tooth pick.

Be sure to have the reference photo IN FRONT OF YOU. That photo has all the information you need to finish this painting, not the photo of where I was in class, that only lets you know where I stopped for the day, the reference photo is where you are headed and helps you see where you are in relationship. Get it out and use it.

I know it is tempting to just put paint on the brush and follow along those long sweeping lines of the fenders and truck body but please resist the urge. Remember that you want to keep the edges soft for now. It may be hard in some areas but do the best you can. Using the flat edge or you brush, place it on the outside edge of what you are painting and pull in. Move down the entire edge of what you are painting in this manner to keep the edge soft. The inside can be scumbled – strokes going every which way – rather than smooth strokes, it will add texture to the area and this is an old, beat-up truck, it has lots of texture.

I had mixed up a pretty good sized amount of my base color to start out, when I got to lighter areas I added more red or yellow, to the darker areas I added touches of blue and/or purple depending on how dark the area was. You can mix the colors on your canvas or you can pre mix on your palette just using a corner of your base color to mix in saving the rest for other areas. For the real dark areas I added a lot of blue, mostly, and some purple, this dark can also be used to paint the tire. Some of my students who have been with me for a while need to start working a bit more wet into wet to blend colors, it will give you more variation.

Also notice that I wasn’t worried about what I was painting. I didn’t try to figure out all those parts and pieces yet, I just under painted them with the base color for now, I will pick them out later – if I feel so inclined.

The rock was under painted with a different type or gray mix than I usually use, this time I used yellow with touches of purple to get a warm gray color. These are complimentary colors and together they make a very nice gray. To make it darker I added more purple with touches of blue. Remember it is not a wall but a rough rock, dab and poke and scumble the color on, this is a good place to practice wet into wet, start with the warm gray color and – without cleaning your brush – pick up touches of purple and blue and work it into the shadowed areas under the truck.

The wood frame inside the cab is a bit on the blue side if you have cobalt or cerulean blue, you can use either of those with a touch of purple and sienna to darken and gray the color if you only have ultramarine blue, add a touch of green, purple, sienna and white to get a soft blue/green color, this is for the shadow areas of the frame and the whitewall of the tire. For the sunlit parts of the frame mix more white and blue with your dirty brush to get a lighter version.

You should have your whole truck under painted at this point; we will start on the highlighting and shadows next class. See you soon.


Saturday, September 29, 2012


Fall 2012 Acrylic Class – Scotty’s Truck

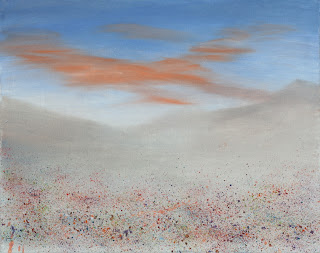
We start off the truck just like we start most paintings by starting with what is furthest away and working our way forward. Since the sky is about as far as we can go visually, that is where we start before we ever put on any drawing on our canvas. This allows us to avoid a cut and paste look to our painting when we are done. Unlike oils, acrylics dry quickly so we cannot blend or soften edges whenever we want which is why we must start from furthest and work to closest.

I did do a little sketching in that I wanted to know where my sky ended and my distant hills began then I took my gesso and applied a coating of it to the sky area and also down a bit into where the hills will be. I did this with my 2” soft blending brush and will continue to use this brush for the background, if your brush has hard bristles, this technique will not work. You need a soft goat hair blending brush which will make it look almost like air brush, any other type of brush will give you streaks.

Next, using the same soft blending brush, I first wipe out as much of the gesso as I can but I did not wash it. To one corner I picked up ultramarine blue, on the other corner I little burnt sienna and a touch of purple. You want the color to be mostly blue, the sienna grays it a bit and the purple intensifies it a bit but it will be mostly blue. Your gesso should still be wet when you add in your color, with your bristles parallel to the top and bottom of the starting at the top, just streak these colors across the top of your canvas and work it down an inch or two. Wipe out your brush a bit and straighten the bristles you will be using your brush to blend and move the paint down the canvas.

Using big “X” type strokes and very little pressure on your brush starting at the top of your canvas working across and down, move the blue from top to past where you hill will start. You should be painting “wet into wet” all of these words take a lot longer to write or to read than you should be taking with your sky. Each of these steps blend into each other so once you start this do not stop to read because your paint is drying. If it feels like your brush is dragging a bit you can spritz it with water from your spray bottle if you hold it back and use a fine mist and only a couple of sprays then quickly blend in the water into your paint and continue to paint. If you need to add more color start at the top with the added color and blend down.

If you want to add some clouds at this point, rinse your brush well and dry the bristles out as good as you can, I squeegee it between my fingers to get off the excess, then on the corner of your brush pick up a color you want for your clouds, I put in orange clouds but if you want some white or gray or pink, that is up to you. I am still using my blending brush, by-the-way, I still need those soft bristles.

I streaked the orange into the sky in the areas where I wanted clouds, and then I rinsed my brush, dried it out and blended the clouds into the sky using the same gentle stroke I used for the sky itself. Your sky should still be wet so as you blend your clouds they will soften into your sky. I still used the “X” stroke but it was a lot flatter than what I used in the sky to give my clouds a soft streaky look.

Be aware that I am still working wet into wet because I keep working, this is important so that you don’t over work your painting and you keep you paint wet for blending.

Next I added more gesso to the lower part of my painting where my hills will be. Work the gesso up to the bottom of the  sky area so you get full coverage. You can wipe out your brush but no need to clean if before you add burnt sienna, a touch of blue and an touch of cad yellow. You can blend this on your palette or on your canvas, it might work better for you if you use your palette so your mix is fairly even. Straighten out the bristles of your blending brush, you will be using the straight edge of your brush to form the edges of your hills. Start your hill a bit up into your sky by placing the edge of your brush where you want the edge of your hills and pull straight down and form the entire top edge of your hills in the same manner. What this does by using the edge of the brush rather than just painting the top of the hills in one long stroke, it keeps the edges soft. Hard lines can be very had to eliminate in an acrylic painting so we do our best to keep edges soft. The bottom part of the hills can be scumbled in and gently blended. Work quickly and when you have that area covered, give you brush a good rinse and dry, then using those soft big “X’s” soften the edges between sky and hills even more.

If you want to take a break at this point you can let your canvas dry before starting the next step or you can keep on going. You will need a toothbrush or a bristle brush and all your paints out and your water. You can use every color you own for this step and it won’t be wrong. Actually, the more the merrier too little doesn’t do what we need it to do. This technique is a great way to do sand and flowers and snow, your toothbrush can be a very handy piece of equipment.

Start by picking up some water on your toothbrush and forming a puddle in your palette, next pick up a color ANY COLOR, and mix it well with the water. You may need to add more water because you want this paint to flip off your brush. You might also want to cover your sky with paper towels because this can get messy especially if you are using a regular bristle brush. When your toothbrush is loaded, point the bristles down and towards your canvas and with your thumb, rake it along the end of the bristles. You should get splatters of all sizes and shapes and that is what you want. Continue this process using all the colors you have and cover the bottom third of your canvas with lots of splatters. This is where we ended the day.

Try to have your truck on your canvas for next class remember to use charcoal and not pencil. Also make the truck big enough that is covers a large area of your canvas, it is the focus of the painting not the hills, it will also make it easier for you to paint. See you in class.


Sunday, August 12, 2012


ACRYLIC CLASS SUMMER 2012 – P.V. Bunny

This week I basically finished up the bunny. My under painting was as far as I could take it on the rabbit and the background, all that was left was to under paint the rocks and foreground  add some highlights and weeds and I have a finished rabbit sitting in the rocks.

I know that sounds way to simple but really, that is all there is to it. It only seems like more when you make it out to be more. One of the pitfalls most beginning students fall into is making mountains out of mole hills. When you start a painting project you don’t envision an end to your journey and as that end starts coming into view, you want to take side trips and detours because you can’t imagine that the end is within grasp. You need to embrace this part of the process to work to a natural end of your painting, otherwise, if you keep making work for yourself, your paintings become overworked and uneven, the term “less is more” is very apropos in this case, it is better to feel that you painting could use just one more thing than to think “I should have stopped an hour ago”.

The first thing I needed to do was to under paint the rocks in front of the rabbit. These rocks are light so my under painting doesn’t need to be too dark but it does need to be a darker version of the final highlights. I used orange, with touches of sienna, white and yellow and in the shadowed side I also added touches of purple to gray the color and cool it down. I just scumbled in some rock shapes and I didn’t care if it looked like what was in the photo or not, I did try to get close at least in size. I also brushed mixed a lot of these colors on the canvas. That means I picked up the colors and either went directly to the canvas or only lightly mixed on my palette before applying it to the canvas, this allows for more variation in color and that is a good thing.

While I let that dry, I worked a bit more on the rabbit, brightening or intensifying a color to give it a sunlit look. I try to avoid white when I can and use it only when I’m up to my final highlights because white can make your colors look chalky. Add yellow to sienna to lighten and brighten the fur on the back. The same goes in the weeds at this point, pure color like yellow  or yellow mixed with a bit of orange or sienna for foreground weed highlights is a good thing.

However, before you get to the foreground weeds be sure that you have enough weeds in the background. These can be weeds of all colors from browns to grays to blues and purples, these will be your shadowed weeds and the darker colors will allow the foreground weeds to stand out. I used both my ½” flat sable brush and my liner to make these weeds.

If your rocks are dry you can highlight them with a mix of white (or gesso) and touches of yellow, orange or sienna or a combination of these colors, this will be a very light color and remember that the sun is coming from the upper right hand side so the rocks will have their highlights on top and on the right. Don’t spend too much time making your rocks “perfect” because you don’t want them to detract from your rabbit plus you are going to be pulling weeds up in front of them and in between them, they are just there to put the bunny in his environment.

The foreground weeds can go in much the same way as you did the background weeds the only difference is they can be a bit lighter because they are in the sun – remember this is just under painting so not too light – and use colors like yellow and sienna as well as grays. Another thing to be careful of when doing any of the weeds is to make sure that they go all different directions, not just straight up lined up like a fence. They should bend, have breaks, some should be almost flat, some curled, some split…These are dried weeds and anything goes.

I also added some greener bushes in the corners and middle-ish to suggest other plants in his environment, but it wasn’t straight green. I used hooker’s green with touches of purple and/or sienna mixed in to gray the green so it wasn’t too different in color from the other weeds. With a liner brush I added some twigs to the green branches to give them some support.

At this point you might want to call it done and that is up to your, however, as I looked at my painting there were some things I really think – for me  - need to be done to finish it off the way I want it to look so I will be showing you how I would detail out the rabbit and to make changes when you need to. I will see you all in class.

Sunday, August 5, 2012


ACRYLIC CLASS SUMMER 2012 – PV Bunny

This week I started to get some detail in the bunny. It is absolutely essential when you are trying to make something look reasonably real that you have your reference photo in front of you, many of you were looking at what I was doing and trying to follow along but that is not your best reference. I can show you technique but I don’t always get the subtle changes in color right, which doesn’t bother me because I will go back over an area but if you don’t see that step you can get lost in a hurry. That photo I provide is your map and you need to have it out so you can look at it and find your own way through the color and fur direction.

Basically, I mixed up blue, sienna and a touch of purple as my base color, to it I added more sienna, orange and/or yellow to lighten and make it browner, more blue and a touch of purple for a dark color or white if I needed gray. Those are the only colors I used.

Most of what I did was dry brush with a #4 flat bristle brush, what that means for the new students is after rinsing my brush, I dry it off to get out as much of the water as I can before loading it up with paint, and I also wipe off excess paint before I start to paint. Then when I actually do paint, it is with very little pressure and I want the bristles to separate to give me a “furry” look to my bunny. These are light quick strokes IN THEDIRECTION OF THE GROWTH OF THE FUR. I put emphasis on that because as I walked around I saw several people painting the fur on in one direction but even if it is part of the under painting, it is important to follow the way the fur is growing on the animal or you can and will have problems when you get close to finished, the eye will see those strokes unless you hide them well (read “repaint”) and it won’t look “right”. All our strokes have a purpose from beginning to end, if we try to cut corners it could come back to bite us in the end. Just so you know.

One thing I did after a layer or two of fur, I looked at what I was doing and compared it to my photo. What I was most interested in was making sure that I had enough contrast in places so that the rabbit would stand out from the background in the end. When I did this, I noticed that behind the back of the bunny, the rock was a bit lighter than the back of the bunny so I added some lighter gray to the area behind the bunny so its back would show. Under his chin and down his front the fur is very light from the back lighting of the sun so I needed to darken behind the rabbit around the mouth, under the chin and a bit on his chest, when I do the final highlights this dark area will help me make the rabbit stand out.

This was fairly repetitive and time consuming though there are some things you need to watch out for, one of them is the use of white at this point. If you are working in a gray area adding a bit of white is okay, just don’t go to your lightest lights just yet, still should be shades of gray. In the sunlit areas on the back and face, however, it is better to lighten with yellow or orange rather than white because white can make your color look chalky. You may eventually use a touch of white for the brightest highlights but we are not to that point yet, that will come at the very end and you need to have these other colors present for a more natural look.

I also want you to note that I added just a few touches of lavender gray into the darkest areas of the shadows on the bunny. There will be a lot of reflected light coming off the rocks that will reflect back into the fur but please, these are just “touches” don’t make you bunny butt purple, a little goes a very long way.

Depending on where everyone is and how much I get done, I may be able to finish up the bunny during the next class so start looking for your own project when we are done with the bunny. We will have a make-up class at the end, I do want to thank everyone for your support and understanding during this trying time in my life, it was a great comfort to get back to class.

Monday, July 16, 2012


I am just going to give a brief description of what we have done to this point, if you have questions please ask in class or email me I will try to answer.

The under painting was done mostly in earth tones which include yellow, orange, sienna, red, green blue and purple. To lighten a color I added gesso, if I needed the color darker I didn’t use gesso. I was just trying to get the overall feel of light and shadow, I wasn’t doing anything specific.

I used a #10 bristle brush and a scumbling stroke. When you scumble on your canvas, you brush is going in all different directions, I tend to use the small side of the brush or the flat of it, but my brush moves constantly and I am “brush mixing” my colors. That means I pick up a color or colors and mix them on the canvas. this is a good habit to get into because it creates a more interesting painting.

I didn’t worry about the rabbit, I just painted everything with these dry, weedy colors. I had done some preliminary weeds but that isn’t necessary at this point. That was week one.

Week Two: I sketched in the rabbit. Be sure he is big enough on your canvas that he is the focal point but give him some room in front so he can run. This is a “landscape” (horizontal) format, vertical or portrait would make him too small in the painting and give too much importance to the rocks and weeds. Be careful of proportions his body is about 2 and an 1/8th length of his head from ears to nose.

To under paint the rabbit I mixed up a base gray color which consists of ultra marine blue, purple, burnt sienna and a touch of gesso or white. I want it pretty dark but not black. As I paint, I will add more sienna to make it warmer in some areas or more gesso to make it lighter in other areas, I am looking at the rabbit while I am painting so I know where I need to make slight changes to my colors.

I was using a #6 flat bristle brush and my strokes follow the direction of fur growth on the rabbit. It is not all one direction and changes as it covers the rabbit.

On the inside of the front ear there is a touch of pink showing, without cleaning my brush I added a touch of red and gesso to make a dirty pink color. The dark mix for the eye, nose, and tip of the ear was the above mix for gray without the gesso or white.

At this point I needed to adjust the background colors around the rabbit so he will stand out when we are finished, His back is a bit darker that the rocks behind him so I added some gray to the rocks (one of the reasons I changed my mind about doing the weeds earlier) and there are some flattened weeds in front and behind him I used a mix or yellow, orange, sienna, some of the gray and just scumbled some shapes in front and behind him. This scumbling is still going all directions but is mostly horizontal.

That is the basic idea up to this point. There will be adjustments as we go along so don’t worry about anything right now, this is just under painting and it can look a bit sloppy and it will turn out great in the end. Be patient and don’t sweat the small stuff. 

Sunday, May 27, 2012

Acrylic Class Spring 2012


If you have gotten all your under painting finished, it is now time to start the detail work that will finish you painting.

I need to reiterate about under painting: Just because I call it "under painting" doesn't mean that you have to paint over it all. Quite the contrary, most of what has been called "under painting" will become the shadows or texture or what ever else depending on where it is in your painting, it is very important to the final look of your painting so PLEASE do not paint over all of this good under painting in the process of finishing your painting.

The apples need a highlighted area. This is more than just a white dot if it is too look like an apple. If you haven't already or if need to do more to make your highlighted area look bright enough, mix orange with your red (napthol or cadmium) to make a lighter color. If you mix in white, it will turn your red to pink and that's not the look we are going for this time. Even using touches of yellow will brighten the color. This color goes on the area that is getting direct sun the top "shoulders" of the apples or the sides that you think are facing the sun. this color changes to a darker red pretty quickly as it curves away from the light so blend it into the rest of the apple with your finger or by adding touches or red. If you have any doubts about how light plays on the surface of an apple, if you have an apple or use something rounded and place it near a single light source such as a bright window or a lamp and LOOK at how the light plays off the apple. See where the shadows are. I can talk until I run out of words but unless you learn to see these things for yourself, you will have difficulty painting them.

A problem I saw with many of you was not only using this highlight color on your whole apple but you also weren't getting the shadows down in between the apples. It is hard to get a pile of apples but the next time you are in the store, look at the fruit on display. You will see – even in that bad light – that in the spaces between the fruit is very dark. They are casting shadows on their neighbors and on the fruit underneath them so it is very dark, this is even more pronounced when you have only one light source. You must have dark to show the light, you also need that light to dark to show shape and contour. Look for it and understand it so you will know how to use it in the future.

The green apple gets a mix of yellow, sap green and white for its lightest area but the same rules apply this is only where the sun is hitting it the most, not for the entire apple.

While those are drying, if you put in a handle like I did, you can detail it out by putting  on a highlight and a shadow just remember that the shadowed side won't be as dark as the inside of the bucket because it is getting a lot of reflected light into its shadow. You can even throw in a touch or orange or sienna into the shadow as light might be reflecting off the bucket and onto the handle.

You can also block in the leaves at this point if you are putting them in. They need to be dark green so a mix or sap or Hooker's green with blue and/or purple make a dark green for their under painting. We will detail them out later.

If your apples are dry you can put on the brightest highlight. This is white with a very tiny touch of yellow in it just to slightly tint it, it should still look white but with some warmth. This just gets put where you are going to have the "glint" on the apple like the glint in the eye. Just tap it on in a very small area then either wipe out your brush to tap the edges or use your finger to spread it just slightly, then leave it. When it is dry in a minute or so a tiny touch of pure white right in the center of that spot and your apple sans leaves will be done.

To finish the leaves you will need an apple green color which is sort of a bluish/ gray green color. To get this add sap green, blue a touch of sienna to enough white to make it light enough to show against the dark color then paint only the parts of the leaf that will be in the light. That dark under painting becomes the form shadows of the leaf.

Now for the grasses: I used my #10 flat bristle brush to start pulling up grasses around my bucket and my apples. I will do more detail with my liner but this is to get the mass color and shapes in. I used a "flicking" type motion. Holding my brush back on the handle and using my lighter colors (yellows, greens, orange, just light colors because they are in the sun light), starting at the base of the bucket and pulling up the grasses in front of the bucket, you will see how the dark under the bucket works for you by giving contrast to the lighter grasses in front. PLEASE don't cover all of this dark, just pull up enough grass to get your point across nothing more. Work you way thru the apples though the brighter colors will be where the sun hits, use darker colors where it might be in shadow and give some texture to the grass.

Finally, get out your liner brush. If you haven't used this brush much, you might want to practice with it. First off your paint needs to be very inky in consistency. If you tip your palette it should run. To load your brush, wiggle the whole bristle end of the brush in the paint and as you lift it off your palette, roll it between your fingers to bring it to a point. Holding the brush and close to the end as you can, using your wrist to make it go in circles, get your brush moving BEFORE you touch your canvas and keep it going! Touch the canvas or the paper on the up stroke, then lift and move to the next place while you are still circling your brush. You can practice on paper with just water if you want, but learn how this brush works before you get to your canvas and it will do some amazing things for you. Big circles make tall grass, small circles make short grass. You can also dab and touch with this brush to make seed heads. Try making circles in both directions (not as easy as it sounds) and bend and break some of your grass.

You will use different colors for your grasses depending where you are and you will use this brush in both the foreground around the apples and in the background grasses. Use darker, cooler colors in the shadows, warmer, brighter colors in the sunnier areas. I put some darker weeds in the corners to vignette the painting but you will have to finish the painting the way you want it to look.

I may work a bit more on my painting before next week but am ending this part of the project here. I see some things I want to change in mine that may be okay on yours so if you see a bit of difference between now and then, this is only for aesthetic reasons not to "pull a fast one" on you. I am going to show how I got the glow in the original painting we are working from and maybe how to varnish it when it is done. You may continue to work on this painting if you haven't finished it or start on another project. We only have two more weeks before the end of the semester so there isn't any time to work on something else.

Torrance only has 2 more classes the classes will start up again on June 19th so be sure to get signed up as soon as you can. If you have Google Chrome, I have started a Circle for my art classes if you want to comment or post a photo of things you are working on, it can be a bit more interactive than just a blog. You are all doing amazing work, keep it up and I will see you next week.